Blog
Verifying the power of a PCIe board with 16 Google® Coral Edge TPUs(1)Environment construction and simple operation verification
Japanese / English
I am Katsuya Hyodo, a member of the CyberAgent AI Lab HCI (Human Computer Interaction) team. I have been working with a research team at Osaka University as a research engineer since April 2021. HCI is a word that may be unfamiliar to you, but we are a team that researches and develops customer service dialogue agents. Previously, I was managing the R&D team of a SIer. I am surrounded by people with amazing backgrounds, which makes me feel very intimidated, but I am able to expand my activities.
Now, some of you who are reading this article may know about my private activities, but this time I would like to write about something a little different from what I usually do. I was told that I can write whatever I want. I’m excited.
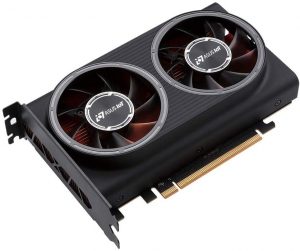
Figure 1. CRL-G116U-P3DF (Cited [1])
1. Google® Coral Edge TPU CRL-G116U-P3DF
This is my first blog, and I will be examining the performance of this device and looking for realistic ways to use it. This is a high-performance accelerator card with 16 TPUs, released by ASUS in December 2020. The selling price on Amazon as of June 8, 2021 is $2,911. First of all, let’s take a look at what the specifications of this device are. The right column shows the specs of the CRL-G116U-P3DF that I will be testing. One thing worth noting about the specification is that it takes up a PCI Express 3.0 x16 slot, which conflicts with the GPU slot. And it’s as big and expensive as a GPU. It’s a trade-off between price and performance, but the pricing is a bit annoying. What is the best way to use the system?
Table 1. CRL-G18U-P3DF / CRL-G116U-P3DF specifications (Cited [2])
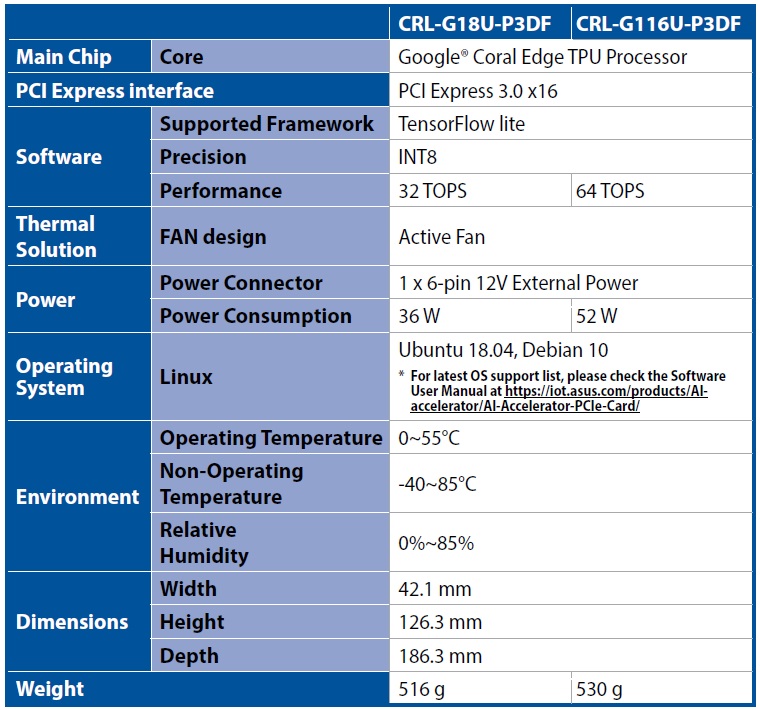
Also, the officially supported OS is Ubuntu 18.04 or Deian 10, which is quite old. If all the necessary resources are available as OSS and buildable, you may be able to install it on the latest Ubuntu 21.04 or Debian 11 OS. However, in order to avoid running into compiler version discrepancies, which could delay the verification process, we will follow the official tutorial.
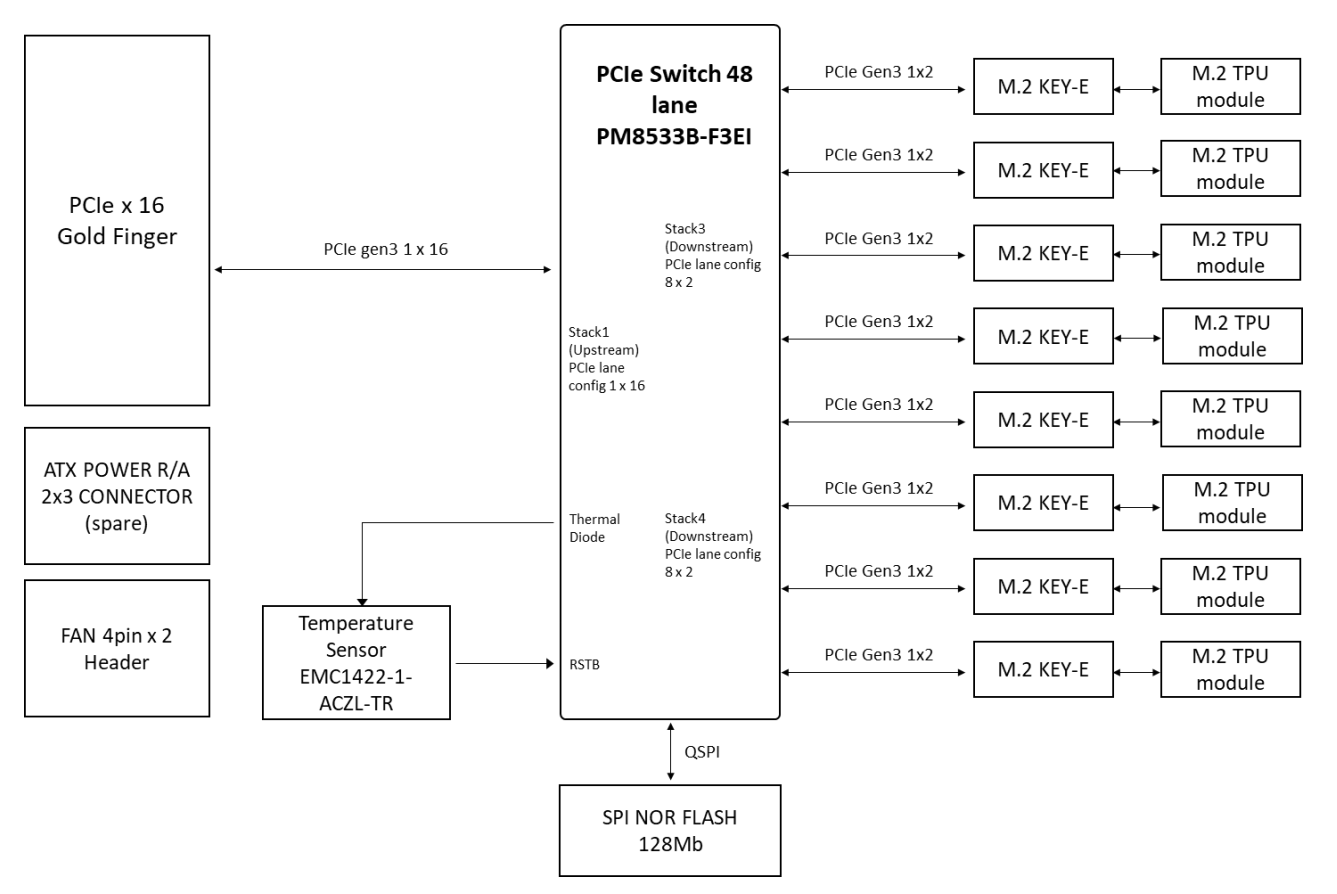
This is a block diagram of the hardware. You have 16 TPUs connected there, two each with PCIe Gen3. In the past, my experience of using three of them in parallel for a long time was that they could get quite hot when used continuously. To keep the operating temperature of the 16 TPUs below the upper limit of 55 °C, two cooling fans are included, which I find somewhat satisfying.
Figure 2. Block Diagram (Cited [3])
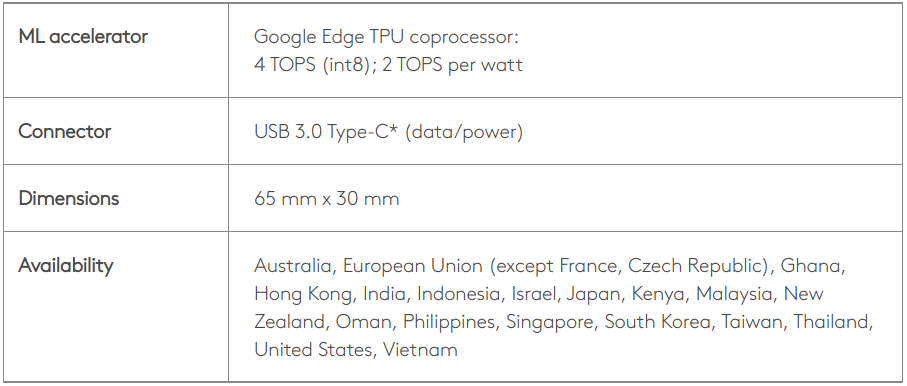
Before setting it up, let’s compare it to the EdgeTPU USB Accelerator , just in case. If the exact numbers are nominal, the USB Accelerator is supposed to have 1.6 times higher processing performance per WATT. Also, at first glance, it appears that the processing performance per WATT is higher than that of a typical RTX30xx series GPU, but since the EdgeTPU is a device specialized for INT8 integer operations, we believe that a simple comparison is not possible. I will verify the operation later, but it seems to be high performance enough if you don’t take into account any degradation of the model accuracy due to INT8 quantization. The problem is how to use and operate 16 TPUs well.
Table 2. EdgeTPU USB Accelerator specifications (Cited [4])
2. Kitting of Google® Coral Edge TPU CRL-G116U-P3DF
So, without further ado, let’s kitting the accelerator card. The procedure for physical installation on the PC chassis is omitted, and the procedure from the software installation part is described sequentially. If your OS version is Ubuntu 18.04, you can follow the official user’s manual and get to the first operation check in about an hour. The official documentation is here.
2-1. Install the Edge TPU driver
2-1-1. Checking the Kernel version
If the version number displayed as a result of executing the following command is 4.18 or lower, go to 2-1-4. If 4.19 or higher, go to 2-1-2.
|
1 |
$ uname -r |
2-1-2. Check for the existence of the Apex driver
If nothing is displayed as a result of executing the following command, go to 2-1-4. If you see output that includes the word apex, go to 2-1-3.
|
1 |
$ lsmod | grep apex |
2-1-3. Disable Apex and Gasket
Execute the following command to reboot.
|
1 2 3 |
$ echo "blacklist gasket" >> /etc/modprobe.d/blacklist-apex.conf $ echo "blacklist apex" >> /etc/modprobe.d/blacklist-apex.conf $ sudo reboot |
2-1-4. Driver installation
Execute the following command to reboot.
|
1 2 3 4 5 6 7 |
$ echo "deb https://packages.cloud.google.com/apt coral-edgetpu-stable main" | sudo tee /etc/apt/sources.list.d/coral-edgetpu.list $ curl https://packages.cloud.google.com/apt/doc/apt-key.gpg | sudo apt-key add - $ sudo apt update && sudo apt install -y gasket-dkms libedgetpu1-std $ sudo sh -c "echo 'SUBSYSTEM==\"apex\", MODE=\"0660\", GROUP=\"apex\"' >> /etc/udev/rules.d/65-apex.rules" $ sudo groupadd apex && sudo adduser $USER apex $ sudo rm /etc/modprobe.d/blacklist-apex.conf $ sudo reboot |
2-2. Install the Edge TPU runtime
2-2-1. Install the Python library (PyCoral)
Execute the following command.
|
1 |
$ sudo apt install python3-pycoral |
2-3. Checking Edge TPU operation
Verify that “Parrot Image Recognition” is working properly. Execute as follows.
|
1 2 3 4 5 6 7 |
$ mkdir coral && cd coral $ git clone https://github.com/google-coral/pycoral.git && cd pycoral $ bash examples/install_requirements.sh classify_image.py $ python3 examples/classify_image.py \ --model test_data/mobilenet_v2_1.0_224_inat_bird_quant_edgetpu.tflite \ --labels test_data/inat_bird_labels.txt \ --input test_data/parrot.jpg |
If the result is displayed as shown below, the installation is successful.
|
1 2 3 4 5 6 7 8 9 10 11 |
Initializing TF Lite interpreter... INFO: Initialized TensorFlow Lite runtime. ----INFERENCE TIME---- Note: The first inference on Edge TPU is slow because it includes loading the model into Edge TPU memory. 11.8ms 3.0ms 2.8ms 2.9ms 2.9ms -------RESULTS-------- Ara macao (Scarlet Macaw): 0.76562 |
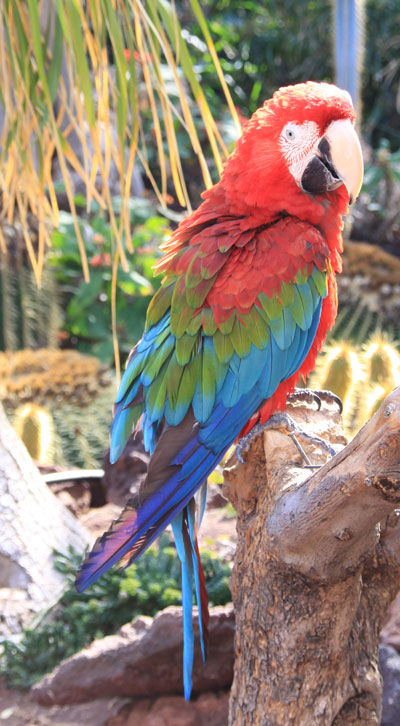
The image to be recognized is that of a parrot (Ara macao), as shown below. Up to this point, I was able to get it to work without any stumbling blocks, just like when using the EdgeTPU USB Accelerator. It’s very easy. Since it is meaningless to verify only this, we would like to explore what we can do to maximize the benefits of multi-TPU by using specific APIs.
Figure 3. Ara macao (Cited [5])
3. So much for the first article
I know it is a bit insufficient, but this first article is only about setting up the environment and a simple operation check. In the next article, I plan to write a series of articles on the following topics without much time lag. However, the details and the order of publication will be changed flexibly depending on the results of the verification. Many of the articles I usually write in other spaces are very voluminous, but due to the limitations of the tools I use to write this article, it was very difficult to write a large volume of articles all at once, so I decided to split it up.
- Partitioning and Multi-TPU Inference of Quantized Models
- Partitioned inference of input data
- Serial inference of models for different tasks
- Parallel inference of models for different tasks
- Verification of resistance to continuous operation
- Verifying whether it is possible to drive containerization for each TPU
- Building an Inference Pipeline
See you next time.
4. References
[1] ASUS, AI-Accelerator-PCIe-Card, Overview, https://www.asus.com/jp/Networking-IoT-Servers/AIoT-Industrial-Solution/AI-Accelerator/AI-Accelerator-PCIe-Card/
[2] ASUS, AI Accelerator Card CRL-G18U-P3DF/CRL-G116U-P3DF Hardware User Manual, 1.3 Product specification
[3] ASUS, AI Accelerator Card CRL-G18U-P3DF/CRL-G116U-P3DF Hardware User Manual, 1.7 Block diagram
[4] Google Coral, USB Accelerator Tech specs, https://coral.ai/products/accelerator/
[5] Google Coral, Get started with the USB Accelerator, https://coral.ai/docs/accelerator/get-started/#3-run-a-model-on-the-edge-tpu
Author