Blog
ONNXモデルのチューニングテクニック (基礎編)
サイバーエージェント AI Lab の Conversational Agent Teamに所属している兵頭です。今回は私が半年ほど蓄積したONNXのチューニングテクニックを全てブログに残したいと思います。皆さんが既にご存知であろう基本的なことから、かなりトリッキーなチューニングまで幅広くご紹介したいと思います。長文になりますがご容赦願います。
このブログのメインターゲット層は「リサーチャーが実装したモデルを実環境へデプロイするタスクを有する方々」です。一部リサーチャーの方々の参考になる情報が混じっていることもあるかもしれませんが、あまり興味を引かない内容だとは思います。リサーチャーメインの組織に属しながらリサーチエンジニアの立ち位置で身を投じていますので、研究の観点の少し手前あるいは少しその先の部分を担っている立場からこのブログを記載しているものとご認識願います。
いきなりですが、我々のチームでは一緒に Human Computer Interaction の研究・開発を行っていただけるリサーチエンジニアを募集しています。本ブログを見てご興味を持って頂けた方は是非一度カジュアルにお話させてください。よろしくお願いします。
-
-
クリックするとYouTubeへ遷移します。
1. このブログに記載すること
- ONNXモデル生成の基礎的な方法
- ONNXモデル生成の応用的な方法
- ONNXモデルの簡易的な推論方法
- ONNXモデルの簡易的なベンチマーク方法
- ONNXモデルのチューニング方法
- ONNXモデルのフレームワーク間コンバートのテクニック
2. このブログに記載しないこと
- ONNXとは何か
- モデルのトレーニング
- 数学的な演算ステップの効率化
- ランタイムに最適化したカスタムオペレーションの実装
- ONNX推論高速化のためのロジック側の工夫
- ONNX推論高速化のための onnxruntime / onnxruntime-gpu のパラメータチューニング
- ONNX以外のフレームワークの特徴
- ONNX以外のフレームワークを使用した推論方法
- ONNX以外のフレームワークへ転用したあとの推論の高速化手法
3. このブログに記載のソースコードを動かすための環境
このブログ内で使用する環境は下記のとおりです。HostPCの環境を壊さないために、 Docker や Google Colaboratory を活用するとトラブルなく試すことができます。 Anaconda は非推奨です。
- Ubuntu 20.04+ or Windows or Mac
- Python 3.8+
- PyTorch v1.13.0
- TensorFlow v2.10.0
- onnx v1.12.0
- onnxsim v0.4.8
- simple-onnx-processing-tools v1.0.76
- onnx2tf v1.1.25
- onnx-graphsurgeon 0.3.24
3-1. Docker を使用して試す場合
|
1 2 3 4 5 6 7 8 9 |
docker run --rm -it \ -v `pwd`:/workdir \ -w /workdir \ ghcr.io/pinto0309/onnx2tf:1.1.25 pip install torch torchvision torchaudio \ --extra-index-url https://download.pytorch.org/whl/cpu pip install onnxruntime==1.13.1 |
3-2. Google Colaboratory を使用して試す場合
|
1 2 3 4 5 6 7 8 9 10 11 12 13 14 15 16 17 18 19 20 21 |
!sudo add-apt-repository -y ppa:deadsnakes/ppa !sudo apt-get -y update !sudo apt-get -y install python3.9 !sudo apt-get -y install python3.9-dev !sudo apt-get -y install python3-pip !sudo apt-get -y install python3.9-distutils !python3.9 -m pip install -U setuptools \ && python3.9 -m pip install -U pip \ && python3.9 -m pip install -U distlib !sudo update-alternatives --install /usr/bin/python3 python3 /usr/bin/python3.7 1 !sudo update-alternatives --install /usr/bin/python3 python3 /usr/bin/python3.9 2 !python3.9 -m pip install tensorflow==2.10.0 \ && python3.9 -m pip install -U onnx \ && python3.9 -m pip install -U onnxruntime==1.13.1 \ && python3.9 -m pip install -U nvidia-pyindex \ && python3.9 -m pip install -U onnx-graphsurgeon \ && python3.9 -m pip install -U onnxsim \ && python3.9 -m pip install -U simple_onnx_processing_tools \ && python3.9 -m pip install -U onnx2tf \ && python3.9 -m pip install torch torchvision torchaudio \ --extra-index-url https://download.pytorch.org/whl/cpu |
3-3. HostPC を使用して試す場合 (PyTorchのバージョンは1.12.0以上であればどのバージョンでも問題ありません、GPUは不要です)
|
1 2 3 4 5 6 7 8 9 10 11 12 13 14 15 16 17 18 19 20 21 22 23 24 25 |
# CPU pip install -U onnx \ && pip install -U nvidia-pyindex \ && pip install -U onnx-graphsurgeon \ && pip install -U onnxsim \ && pip install -U onnxruntime==1.13.1 \ && pip install -U simple_onnx_processing_tools \ && pip install -U onnx2tf \ && pip install -U tensorflow==2.10.0 \ && pip install -U torch torchvision torchaudio \ --extra-index-url https://download.pytorch.org/whl/cpu or # CUDA 11.6 version pip install -U onnx \ && pip install -U nvidia-pyindex \ && pip install -U onnx-graphsurgeon \ && pip install -U onnxsim \ && pip install -U onnxruntime-gpu==1.13.1 \ && pip install -U simple_onnx_processing_tools \ && pip install -U onnx2tf \ && pip install -U tensorflow==2.10.0 \ && pip install -U torch torchvision torchaudio \ --extra-index-url https://download.pytorch.org/whl/cu116 |
4. モデル生成の基礎 [PyTorch -> ONNX]
良く知られたONNXを生成するための基本的なワークフローは、PyTorch で生成したモデルを torch.onnx.export(model, ...) あるいは torch.onnx.export(torch.jit.script(model), ...) で出力する方法です。改めてこのブログで説明するまでもない内容ではありますが、以降の章で説明する内容の前提知識として簡単に触れておきます。
ONNXを生成するために必要となる最低限の段取りは2つだけです。
- PyTorch でモデルを定義する
- PyTorch の
torch.onnx.export(...)を実行してONNXファイルを生成する
PyTorch を使用して検証用の簡易的な1層モデルを生成します。複雑なモデルをサンプルとして生成するのは手間が掛かりますので、このブログでは LayerNormalization というオペレーションを1個だけ生成する PyTorch のソースコードを作成します。関数などでロジックを共通化したりせずプレーンに記載しています。モデルのトレーニングをすることを主眼としたブログではないため、本来は1.と2.の作業の間に モデルのトレーニング が必要であることにご注意願います。生成済みのモデルをチューニングする、という観点においては、モデルをトレーニングする、ということに関するテクニックはほとんど不要です。重みを微調整するのではなく、演算の順序や構成を組み替えて最適化することに主眼を置くためです。
from onnxsim import simplify は onnx-simplifier というONNXのモデル構造を機械的に最適化してくれるとても便利なツールをインポートしています。この章以降も頻繁に活用するため、あらかじめ作業用の端末にインストールしておく必要があります。
- make_LayerNormalization.py
123456789101112131415161718192021222324252627282930313233343536373839404142434445464748495051525354555657585960616263646566676869707172737475767778#! /usr/bin/env pythonimport torchimport torch.nn as nnimport onnxfrom onnxsim import simplifyimport numpy as npnp.random.seed(0)class LayerNormalization(nn.Module):def __init__(self,embedding_dim,weight,bias,):super(LayerNormalization, self).__init__()self.embedding_dim = embedding_dimself.weight = weightself.bias = biasdef forward(self, x):layernormed = nn.functional.layer_norm(input=x,normalized_shape=self.embedding_dim,weight=self.weight,bias=self.bias,eps=1e-05,)return layernormedif __name__ == "__main__":OPSET = [11, 17]MODEL = f'LayerNormalization2D'N, C, H, W = 20, 5, 10, 10for opset in OPSET:embedding_dim = [C, H, W]embedding_dim_tensor = torch.zeros(size=[C, H, W],)input = torch.randn(N, C, H, W)model = LayerNormalization(embedding_dim=embedding_dim,weight=torch.tensor(data=torch.full_like(input=embedding_dim_tensor,fill_value=0.1,),dtype=torch.float32,),bias=torch.tensor(data=torch.full_like(input=embedding_dim_tensor,fill_value=0.2,),dtype=torch.float32,),)onnx_file = f"{MODEL}_{opset}.onnx"torch.onnx.export(model,args=(input),f=onnx_file,opset_version=opset,input_names=[f'{MODEL}_input',],output_names=[f'{MODEL}_output',],)model_onnx1 = onnx.load(onnx_file)model_onnx1 = onnx.shape_inference.infer_shapes(model_onnx1)onnx.save(model_onnx1, onnx_file)model_onnx2 = onnx.load(onnx_file)model_simp, check = simplify(model_onnx2)onnx.save(model_simp, onnx_file)
作成したソースコードを実行して1層のみのONNXを生成します。
|
1 |
python make_LayerNormalization.py |
LayerNormalization2D_11.onnx と LayerNormalization2D_17.onnx という2種類のONNXファイルが生成されました。これは、プログラム中の opset_version=opset の箇所でONNXのopsetバージョン番号に 11 と 17 を指定して2回実行しているためです。opset とは、ONNXのオペレーションのサブセットのようなものです。指定したバージョンごとに使用可能なオペレーションの種類が異なります。高いバージョンを指定すればするほど複数の処理をひとつのオペレーションに融合した効率的なオペレーションが割り当てられることがあります。詳しくはONNXの公式リポジトリにコミットされている こちら Operators.md の一覧をご覧ください。opsetごとに使用できるオペレーションに差が有ることが分かります。
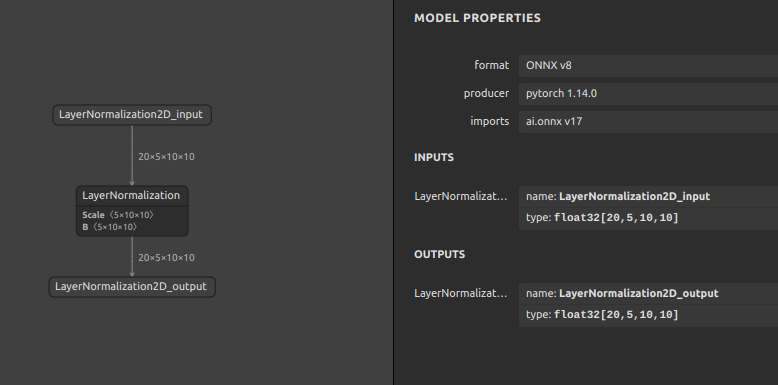
では、opset=11 と opset=17 のそれぞれのバージョンで生成したONNXファイルにどのような差が生じたかをご覧ください。どちらも LayerNormalization の処理であり、入力の値が同じであれば出力の値は同じになります。従って、左の opset=11 で生成したプリミティブな演算の組み合わせを順次実行する処理が右の opset=17 で生成したたったひとつのオペレーションに融合していることが分かります。ONNXのモデルを onnxruntime という実行フレームワークへ読み込ませて実行したときには opset=11 であっても opset=17 であっても基本的には同じ振る舞いをします。この章は基本の章ですので詳細は割愛して後続の章で説明しますが、高いバージョン番号のopsetを指定してモデルの構造を綺麗にまとめたほうがメリットが大きいように見えるかもしれませんが、ONNX以外のフレームワークやTPUやMyriadなどの推論専用ハードウェアアクセラレータへモデルを転用するときに問題が生じることが多いです。そのため、あえて少しだけ古いopsetを指定してプリミティブな演算で構成されたオペレーションに変換しておく、というテクニックが活きるときがあります。実はこのテクニックが活きるシチュエーションはとても多いです。というのも、ハードウェアアクセラレータ側のランタイムのバージョンアップがONNX側の仕様改善のスピードに全く追いつけないからです。最たる例はTensorRTです。
-
Netron でモデル構造を可視化
Opset=11 Opset=17 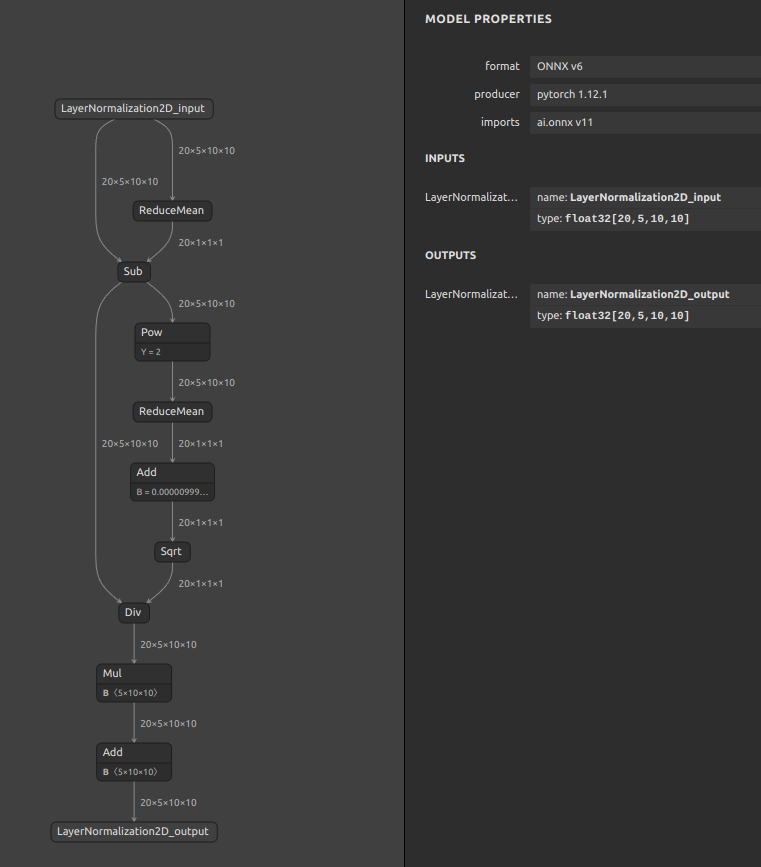
では、生成された LayerNormalization2D_11.onnx と LayerNormalization2D_17.onnx が正しく動作することを確認してみます。しかしながら、検証用の推論コードは 書きません。ONNXの動作を簡易的に検証するためのツールを自作していますのでそちらを利用して動作を確認します。3章の手順を正しく行って環境構築が終わっている場合はすでにそのツールが導入済みの状態になっています。ONNXの簡易動作検証用のツールは sit4onnx と名付けてパブリックに公開しています。

使い方は下記のとおりです。ヘルプメッセージは全て英語で記述していますので、READMEの日本語チュートリアル化のプルリクエストを歓迎します。
-
コマンドラインインタフェース
1234567891011121314151617181920212223242526272829303132333435363738394041424344454647484950515253545556575859606162636465sit4onnx -husage: sit4onnx[-h]-if INPUT_ONNX_FILE_PATH[-b BATCH_SIZE][-fs FIXED_SHAPES [FIXED_SHAPES ...]][-tlc TEST_LOOP_COUNT][-oep {tensorrt,cuda,openvino_cpu,openvino_gpu,cpu}][-ifp INPUT_NUMPY_FILE_PATHS_FOR_TESTING][-ofp][-n]optional arguments:-h, --helpshow this help message and exit.-if INPUT_ONNX_FILE_PATH, --input_onnx_file_path INPUT_ONNX_FILE_PATHInput onnx file path.-b BATCH_SIZE, --batch_size BATCH_SIZEValue to be substituted if input batch size is undefined.This is ignored if the input dimensions are all of static size.Also ignored if input_numpy_file_paths_for_testing ornumpy_ndarrays_for_testing or fixed_shapes is specified.-fs FIXED_SHAPES [FIXED_SHAPES ...], --fixed_shapes FIXED_SHAPES [FIXED_SHAPES ...]Input OPs with undefined shapes are changed to the specified shape.This parameter can be specified multiple times depending onthe number of input OPs in the model.Also ignored if input_numpy_file_paths_for_testing ornumpy_ndarrays_for_testing is specified.e.g.--fixed_shapes 1 3 224 224 \--fixed_shapes 1 5 \--fixed_shapes 1 1 224 224-tlc TEST_LOOP_COUNT, --test_loop_count TEST_LOOP_COUNTNumber of times to run the test.The total execution time is divided by the number of times the test is executed,and the average inference time per inference is displayed.-oep {tensorrt,cuda,openvino_cpu,openvino_gpu,cpu}, \--onnx_execution_provider {tensorrt,cuda,openvino_cpu,openvino_gpu,cpu}ONNX Execution Provider.-ifp INPUT_NUMPY_FILE_PATHS_FOR_TESTING, \--input_numpy_file_paths_for_testing INPUT_NUMPY_FILE_PATHS_FOR_TESTINGUse an external file of numpy.ndarray saved using np.save as input data for testing.This parameter can be specified multiple times depending onthe number of input OPs in the model.If this parameter is specified, the value specified forbatch_size and fixed_shapes are ignored.e.g.--input_numpy_file_paths_for_testing aaa.npy \--input_numpy_file_paths_for_testing bbb.npy \--input_numpy_file_paths_for_testing ccc.npy-ofp, --output_numpy_fileOutputs the last inference result to an .npy file.-n, --non_verboseDo not show all information logs. Only error logs are displayed. -
Pythonスクリプトから利用する場合
12345678910111213141516171819202122232425262728293031323334353637383940414243444546474849505152535455565758596061626364656667686970717273747576777879808182838485868788>>> from sit4onnx import inference>>> help(inference)Help on function inference in module sit4onnx.onnx_inference_test:inference(input_onnx_file_path: str,batch_size: Union[int, NoneType] = 1,fixed_shapes: Union[List[int], NoneType] = None,test_loop_count: Union[int, NoneType] = 10,onnx_execution_provider: Union[str, NoneType] = 'tensorrt',input_numpy_file_paths_for_testing: Union[List[str], NoneType] = None,numpy_ndarrays_for_testing: Union[List[numpy.ndarray], NoneType] = None,output_numpy_file: Union[bool, NoneType] = False,non_verbose: Union[bool, NoneType] = False) -> List[numpy.ndarray]Parameters----------input_onnx_file_path: strInput onnx file path.batch_size: Optional[int]Value to be substituted if input batch size is undefined.This is ignored if the input dimensions are all of static size.Also ignored if input_numpy_file_paths_for_testing ornumpy_ndarrays_for_testing is specified.Default: 1fixed_shapes: Optional[List[int]]Input OPs with undefined shapes are changed to the specified shape.This parameter can be specified multiple times depending on the number of input OPsin the model.Also ignored if input_numpy_file_paths_for_testing or numpy_ndarrays_for_testingis specified.e.g.[[1, 3, 224, 224],[1, 5],[1, 1, 224, 224],]Default: Nonetest_loop_count: Optional[int]Number of times to run the test.The total execution time is divided by the number of times the test is executed,and the average inference time per inference is displayed.Default: 10onnx_execution_provider: Optional[str]ONNX Execution Provider."tensorrt" or "cuda" or "openvino_cpu" or "openvino_gpu" or "cpu"Default: "tensorrt"input_numpy_file_paths_for_testing: Optional[List[str]]Use an external file of numpy.ndarray saved using np.save as input data for testing.If this parameter is specified, the value specified for batch_size and fixed_shapesare ignored.numpy_ndarray_for_testing Cannot be specified at the same time.For models with multiple input OPs, specify multiple numpy file paths in list format.e.g. ['aaa.npy', 'bbb.npy', 'ccc.npy']Default: Nonenumpy_ndarrays_for_testing: Optional[List[np.ndarray]]Specify the numpy.ndarray to be used for inference testing.If this parameter is specified, the value specified for batch_size and fixed_shapesare ignored.input_numpy_file_paths_for_testing Cannot be specified at the same time.For models with multiple input OPs, specify multiple numpy.ndarrays in list format.e.g.[np.asarray([[[1.0],[2.0],[3.0]]], dtype=np.float32),np.asarray([1], dtype=np.int64),]Default: Noneoutput_numpy_file: Optional[bool]Outputs the last inference result to an .npy file.Default: Falsenon_verbose: Optional[bool]Do not show all information logs. Only error logs are displayed.Default: FalseReturns-------final_results: List[np.ndarray]Last Reasoning Results.
起動オプションが豊富過ぎて少々混乱するかもしれませんが、手軽にONNXの動作を確認するために作成したツールですので最低限指定すべきオプションは -if と -oep の2つのみです。-if で動作確認したいONNXファイルを指定し、-oep で ランタイム(エグゼキューションプロバイダ) を選びます。-oep cpu という表記はCPU上でONNX推論を行うことを表し、TensorRTで推論したいときは -oep tensorrt、CUDAで推論したいときは -oep cuda と指定します。CPU推論で動作確認をするときのコマンドは下記のとおりです。
|
1 |
sit4onnx -if LayerNormalization2D_11.onnx -oep cpu |
実行結果は下記の通りです。sit4onnx の内部でONNXのモデル構造を読み取り、入力OPの形状から自動的にダミーのテスト用テンソルを生成してパフォーマンスを計測します。デフォルトは内部で11回ループし、初回ループの計測結果を捨てて、残りの10回分の推論パフォーマンスを計測しています。初回ループの計測結果を捨てているのは、初回モデルのロード時のみ前処理のオーバーヘッドの影響を大きく受けてパフォーマンスが著しく悪化するため、前段のオーバーヘッド部分を除いた推論のパフォーマンスのみを抽出しています。一部界隈では初回オーバーヘッドのことをウォームアップと呼んでいるようです。ベンチマーク結果の単位時間はミリ秒です。
|
1 2 3 4 5 6 7 |
INFO: file: LayerNormalization2D_11.onnx INFO: providers: ['CPUExecutionProvider'] INFO: input_name.1: LayerNormalization2D_input shape: [20, 5, 10, 10] dtype: float32 INFO: test_loop_count: 10 INFO: total elapsed time: 0.3662109375 ms INFO: avg elapsed time per pred: 0.03662109375 ms INFO: output_name.1: LayerNormalization2D_output shape: [20, 5, 10, 10] dtype: float32 |
コンソールの表示イメージです。

ちなみに、TensorRT や CUDA で推論のベンチマークを行いたい場合は、3章で導入した各種パッケージのうち、onnxruntime あるいは onnxruntime-gpu をTensorRTバックエンドを有効な状態にしてカスタムビルドしたパッケージに差し替える必要があります。ご自身の環境に合う TensorRT対応 onnxruntime-gpu のインストーラ生成の方法は下記のとおりです。
注意点として、TensorRT 8.4.0 より新しいバージョンが導入された環境の場合、FP16の演算精度が著しく劣化することがある問題を確認しています。従って、私のHostPC上のTensorRTバージョンは 8.4.0 EA という少し古いバージョンを導入しています。
- Ubuntu 20.04上でのインストーラ生成サンプルコマンド
12345678910111213141516171819202122232425262728293031323334353637383940414243git clone https://github.com/microsoft/onnxruntime.git \&& cd onnxruntimegit checkout 49d7050b88338dd57839159aa4ce8fb0c199b064dpkg -l | grep TensorRTii graphsurgeon-tf 8.4.0-1+cuda11.6 amd64 GraphSurgeon for TensorRT packageii libnvinfer-bin 8.4.0-1+cuda11.6 amd64 TensorRT binariesii libnvinfer-dev 8.4.0-1+cuda11.6 amd64 TensorRT development libraries and headersii libnvinfer-doc 8.4.0-1+cuda11.6 all TensorRT documentationii libnvinfer-plugin-dev 8.4.0-1+cuda11.6 amd64 TensorRT plugin librariesii libnvinfer-plugin8 8.4.0-1+cuda11.6 amd64 TensorRT plugin librariesii libnvinfer-samples 8.4.0-1+cuda11.6 all TensorRT samplesii libnvinfer8 8.4.0-1+cuda11.6 amd64 TensorRT runtime librariesii libnvonnxparsers-dev 8.4.0-1+cuda11.6 amd64 TensorRT ONNX librariesii libnvonnxparsers8 8.4.0-1+cuda11.6 amd64 TensorRT ONNX librariesii libnvparsers-dev 8.4.0-1+cuda11.6 amd64 TensorRT parsers librariesii libnvparsers8 8.4.0-1+cuda11.6 amd64 TensorRT parsers librariesii onnx-graphsurgeon 8.4.0-1+cuda11.6 amd64 ONNX GraphSurgeon for TensorRT packageii python3-libnvinfer 8.4.0-1+cuda11.6 amd64 Python 3 bindings for TensorRTii python3-libnvinfer-dev 8.4.0-1+cuda11.6 amd64 Python 3 development package for TensorRTii tensorrt 8.4.0.6-1+cuda11.6 amd64 Meta package of TensorRTii uff-converter-tf 8.4.0-1+cuda11.6 amd64 UFF converter for TensorRT packagesudo chmod +x build.shsudo pip install cmake --upgrade./build.sh \--config Release \--cudnn_home /usr/lib/x86_64-linux-gnu/ \--cuda_home /usr/local/cuda \--use_tensorrt \--use_cuda \--tensorrt_home /usr/src/tensorrt/ \--enable_pybind \--build_wheel \--parallel $(nproc) \--skip_testsfind . -name "*.whl"./build/Linux/Release/dist/onnxruntime_gpu-1.12.0-cp38-cp38-linux_x86_64.whlpip install ./build/Linux/Release/dist/onnxruntime_gpu-*.whl1sit4onnx -if LayerNormalization2D_11.onnx -oep tensorrt
あるいは、TensorRT やその他の主要MLフレームワークを全てカスタムビルドして導入済みの巨大Docker Imageをダウンロードして利用する方法もあります。23GBほどあります。
- 主要MLフレームワーク全部載せDockerコンテナの起動サンプル
12345docker pull ghcr.io/pinto0309/openvino2tensorflow:latestdocker run --gpus all -it --rm \-v `pwd`:/home/user/workdir \ghcr.io/pinto0309/openvino2tensorflow:latest1sit4onnx -if LayerNormalization2D_11.onnx -oep tensorrt
TensorRTを使用したベンチマーク結果は下記のとおりです。ONNXファイルを TRT Engine という形式にコンパイルする動作が実行されるため、ベンチマークがスタートするまでに1分ほど待つ必要があります。
|
1 2 3 4 5 6 7 |
INFO: file: LayerNormalization2D_11.onnx INFO: providers: ['TensorrtExecutionProvider', 'CPUExecutionProvider'] INFO: input_name.1: LayerNormalization2D_input shape: [20, 5, 10, 10] dtype: float32 INFO: test_loop_count: 10 INFO: total elapsed time: 0.7319450378417969 ms INFO: avg elapsed time per pred: 0.07319450378417969 ms INFO: output_name.1: LayerNormalization2D_output shape: [20, 5, 10, 10] dtype: float32 |
演算精度はFP16ですが、CPUのほうが2倍ほど速いようです。
CUDAではどうでしょうか。
|
1 |
sit4onnx -if LayerNormalization2D_11.onnx -oep cuda |
|
1 2 3 4 5 6 7 |
INFO: file: LayerNormalization2D_11.onnx INFO: providers: ['CUDAExecutionProvider', 'CPUExecutionProvider'] INFO: input_name.1: LayerNormalization2D_input shape: [20, 5, 10, 10] dtype: float32 INFO: test_loop_count: 10 INFO: total elapsed time: 0.7827281951904297 ms INFO: avg elapsed time per pred: 0.07827281951904297 ms INFO: output_name.1: LayerNormalization2D_output shape: [20, 5, 10, 10] dtype: float32 |
ほとんど性能差は出ませんでした。
比較がしにくいため、CPUとTensorRTとCUDAのベンチマーク結果を並べてみます。
- CPU – Intel® Core™ i9-10900K CPU @ 3.70GHz 最大20スレッド
1234567INFO: file: LayerNormalization2D_11.onnxINFO: providers: ['CPUExecutionProvider']INFO: input_name.1: LayerNormalization2D_input shape: [20, 5, 10, 10] dtype: float32INFO: test_loop_count: 10INFO: total elapsed time: 0.3662109375 msINFO: avg elapsed time per pred: 0.03662109375 msINFO: output_name.1: LayerNormalization2D_output shape: [20, 5, 10, 10] dtype: float32
- TensorRT 8.4.0 + CUDA 11.6 – RTX3070
1234567INFO: file: LayerNormalization2D_11.onnxINFO: providers: ['TensorrtExecutionProvider', 'CPUExecutionProvider']INFO: input_name.1: LayerNormalization2D_input shape: [20, 5, 10, 10] dtype: float32INFO: test_loop_count: 10INFO: total elapsed time: 0.7319450378417969 msINFO: avg elapsed time per pred: 0.07319450378417969 msINFO: output_name.1: LayerNormalization2D_output shape: [20, 5, 10, 10] dtype: float32
- CUDA 11.6 – RTX3070
123456INFO: file: LayerNormalization2D_11.onnxINFO: providers: ['CUDAExecutionProvider', 'CPUExecutionProvider']INFO: input_name.1: LayerNormalization2D_input shape: [20, 5, 10, 10] dtype: float32INFO: test_loop_count: 10 INFO: total elapsed time: 0.7827281951904297 msINFO: avg elapsed time per pred: 0.07827281951904297 msINFO: output_name.1: LayerNormalization2D_output shape: [20, 5, 10, 10] dtype: float32
プリミティブな演算のみで構成された opset=11 の LayerNormalization を演算する場合は、私のHostPC上ではCPUのほうが速いようです。ただし、今回はFP16の精度のみでTensorRTの演算速度を検証したため、Int8へ量子化した場合は最大で 2.5倍 ほど速くなる可能性はあります。
念の為、opset=17 で生成した LayerNormalization でも比較しておきます。
- CPU – Intel® Core™ i9-10900K CPU @ 3.70GHz 最大20スレッド
1234567INFO: file: LayerNormalization2D_17.onnxINFO: providers: ['CPUExecutionProvider']INFO: input_name.1: LayerNormalization2D_input shape: [20, 5, 10, 10] dtype: float32INFO: test_loop_count: 10INFO: total elapsed time: 0.4291534423828125 msINFO: avg elapsed time per pred: 0.04291534423828125 msINFO: output_name.1: LayerNormalization2D_output shape: [20, 5, 10, 10] dtype: float32
- TensorRT 8.4.0 + CUDA 11.6 – RTX3070
12345678910112022-11-10 06:55:15.182974909 [W:onnxruntime:Default, tensorrt_execution_provider.cc:1046 GetCapability] [TensorRT EP] No graph will run on TensorRT execution provider2022-11-10 06:55:15.949520352 [W:onnxruntime:Default, tensorrt_execution_provider.h:60 log] [2022-11-10 06:55:15 WARNING] external/onnx-tensorrt/onnx2trt_utils.cpp:367: Your ONNX model has been generated with INT64 weights, while TensorRT does not natively support INT64. Attempting to cast down to INT32.INFO: file: LayerNormalization2D_17.onnxINFO: providers: ['TensorrtExecutionProvider', 'CPUExecutionProvider']INFO: input_name.1: LayerNormalization2D_input shape: [20, 5, 10, 10] dtype: float32EP Error: [ONNXRuntimeError] : 11 : EP_FAIL : Non-zero status code returned while running TRTKernel_graph_torch_jit_2590721683996607622_1 node. Name:'TensorrtExecutionProvider_TRTKernel_graph_torch_jit_2590721683996607622_1_0' Status Message: TensorRT EP output tensor data type: 0 not supported. using ['TensorrtExecutionProvider', 'CPUExecutionProvider']Falling back to ['CUDAExecutionProvider', 'CPUExecutionProvider'] and retrying.INFO: test_loop_count: 10INFO: total elapsed time: 1.1851787567138672 msINFO: avg elapsed time per pred: 0.11851787567138672 msINFO: output_name.1: LayerNormalization2D_output shape: [20, 5, 10, 10] dtype: float32
- CUDA 11.6 – RTX3070
1234567INFO: file: LayerNormalization2D_17.onnxINFO: providers: ['CUDAExecutionProvider', 'CPUExecutionProvider']INFO: input_name.1: LayerNormalization2D_input shape: [20, 5, 10, 10] dtype: float32INFO: test_loop_count: 10INFO: total elapsed time: 1.1889934539794922 msINFO: avg elapsed time per pred: 0.11889934539794922 msINFO: output_name.1: LayerNormalization2D_output shape: [20, 5, 10, 10] dtype: float32
CPU推論が遅くなりましたね。TensorRT 8.4.0 に至っては EP Error が発生し、結果として CUDA にフォールバックしてしまいました。CUDAもCPUとは比べ物にならないほど遅いようです。特定のTensorRTのバージョンとCUDAのバージョンの組み合わせではオペレーションの対応状況が異なることが想定されますので上記のベンチマーク結果が全てではありませんし、最新のバージョンの組み合わせであれば期待通りのベンチマークが出る可能性があります。
さて、このベンチマークはほとんど意味のない比較であることをご理解願います。LayerNormalization 単体で構成されたモデルなど実用的なモデルではありません。そもそも真面目に推論速度を比較することがこの章でご紹介したかったことの本質ではありません。あくまで、簡易的にモデルを生成し、簡易的に推論のベンチマークを行う手段をご紹介したに過ぎません。ベンチマークプログラムを動かすにあたってどこがスループットのボトルネックになっているかまでは一切未検証です。もしかしたら、GPUへのテンソルの転送コストがネックになって全体の処理パフォーマンスが遅いように見えているだけかもしれません。従いまして、実用的な構成のモデルでベンチマークをとってみることのほうが重要です。
5. モデル生成の基礎 [ONNXのみ]
この章では、ONNXのモデル構造の基礎、PyTorchを経由せずにONNXのオペレーションおよびモデル構造を生成する方法をご紹介します。
5-1. ONNXモデルの構造
モデルの動作を微調整するためだけにPyTorchをインストールした環境を用意したくありません。CUDAのバージョンアンマッチや古いバージョンのPyTorchを動作させる環境を整えることにとても手間が掛かることがあります。ただモデルの微調整をする用途のためだけに用意するPyTorchは機能過剰です。すでに手元にあるONNXファイルを少し調整してフローを変えたり、演算の一部を別の演算に置き換えたりしたいときがあります。世界各国のリサーチャーの趣味嗜好が入り混じったPyTorchのソースコードをできるだけ読みたくないのです。他の方々が書いたソースコードを解析するのは非常にコストが掛かります。皆さんがどれほどそういった感覚を持たれるかどうかは分かりませんが、ちょっとした調整をする場合は構造的に綺麗に整理された状態のONNXファイルをNetronで眺めながら課題となる箇所を特定するほうがはるかに手間が少ないときがあります。
したがって、PyTorchに一切頼らずにONNXを直接生成することを考えますが、直接生成するためにはONNXの構造をまず知る必要があります。構造に関しては公式リポジトリにとても詳細な説明があります。Extensible computation graph model 情報量がとても多く理解するのがとても大変ですので、ONNXモデルを生成したりチューニングする際によく注目するポイントなどを絞ってご紹介します。
では、前章で生成した LayerNormalization をもとにして構造を解析してみます。使用するモデルは opset=17 で生成した LayerNormalization です。
-
モデル全体の定義
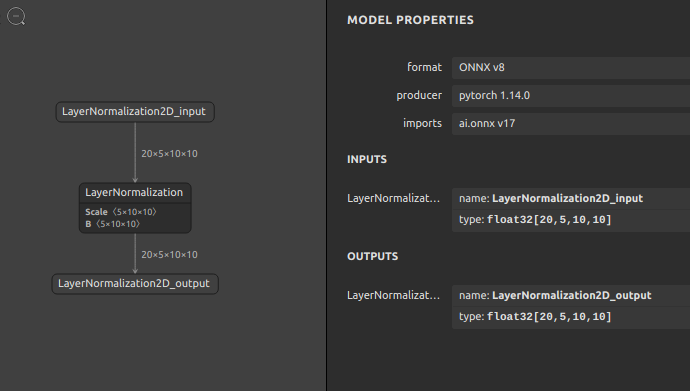
-
LayerNormalizationの定義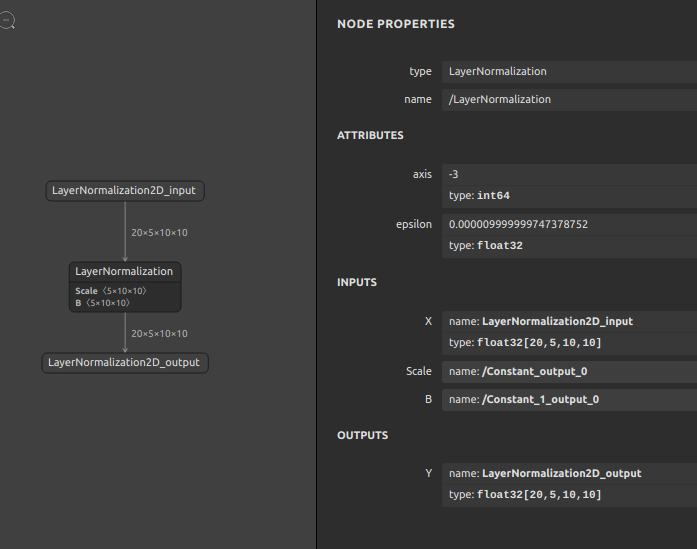
まずは我々人間が構造を把握しやすいようにONNXファイルをJSONに変換してみます。ただ、JSON化するためにわざわざ変換プログラムを書きたくありませんので、自作のツール onnx2json を使用します。

- コマンドラインインタフェース
1234567891011121314151617181920onnx2json -husage:onnx2json [-h]-if INPUT_ONNX_FILE_PATH-oj OUTPUT_JSON_PATH[-i JSON_INDENT]optional arguments:-h, --helpshow this help message and exit-if INPUT_ONNX_FILE_PATH, --input_onnx_file_path INPUT_ONNX_FILE_PATHInput ONNX model path. (*.onnx)-oj OUTPUT_JSON_PATH, --output_json_path OUTPUT_JSON_PATHOutput JSON file path (*.json) If not specified, no JSON file is output.-i JSON_INDENT, --json_indent JSON_INDENTNumber of indentations in JSON. (default=2)
- Pythonスクリプトから利用する場合
123456789101112131415161718192021222324252627282930313233343536>>> from onnx2json import convert>>> help(convert)Help on function convert in module onnx2json.onnx2json:convert(input_onnx_file_path: Union[str, NoneType] = '',onnx_graph: Union[onnx.onnx_ml_pb2.ModelProto, NoneType] = None,output_json_path: Union[str, NoneType] = '',json_indent: Union[int, NoneType] = 2)Parameters----------input_onnx_file_path: Optional[str]Input onnx file path.Either input_onnx_file_path or onnx_graph must be specified.Default: ''onnx_graph: Optional[onnx.ModelProto]onnx.ModelProto.Either input_onnx_file_path or onnx_graph must be specified.onnx_graph If specified, ignore input_onnx_file_path and process onnx_graph.output_onnx_file_path: Optional[str]Output onnx file path. If not specified, no ONNX file is output.Default: ''json_indent: Optional[int]Number of indentations in JSON.Default: 2Returns-------onnx_json: dictConverted JSON dict.
3章の環境構築を正しく行っている場合はすでにインストール済みです。ONNXをJSONへ変換するコマンドは下記のとおりです。
|
1 |
onnx2json -if LayerNormalization2D_17.onnx -oj LayerNormalization2D_17.json |

生成されたJSONファイルをVSCodeなどのIDEで開いて内容を確認してみます。rawData の部分のみ省略してJSON全体を転記したものが下記です。特に説明をしなくてもなんとなく雰囲気がつかめるレベルのシンプルさだと思います。直接書き換えてONNXファイルへ戻すことも可能です。
|
1 2 3 4 5 6 7 8 9 10 11 12 13 14 15 16 17 18 19 20 21 22 23 24 25 26 27 28 29 30 31 32 33 34 35 36 37 38 39 40 41 42 43 44 45 46 47 48 49 50 51 52 53 54 55 56 57 58 59 60 61 62 63 64 65 66 67 68 69 70 71 72 73 74 75 76 77 78 79 80 81 82 83 84 85 86 87 88 89 90 91 92 93 94 95 96 97 98 99 100 101 102 103 104 105 106 107 108 109 110 111 112 113 114 |
{ "irVersion": "8", "producerName": "pytorch", "producerVersion": "1.14.0", "graph": { "node": [ { "input": [ "LayerNormalization2D_input", "/Constant_output_0", "/Constant_1_output_0" ], "output": [ "LayerNormalization2D_output" ], "name": "/LayerNormalization", "opType": "LayerNormalization", "attribute": [ { "name": "axis", "i": "-3", "type": "INT" }, { "name": "epsilon", "f": 1e-05, "type": "FLOAT" } ] } ], "name": "torch_jit", "initializer": [ { "dims": [ "5", "10", "10" ], "dataType": 1, "name": "/Constant_output_0", "rawData": "zczMPc3MzD3NzM...Mw9zczMPc3MzD0=" }, { "dims": [ "5", "10", "10" ], "dataType": 1, "name": "/Constant_1_output_0", "rawData": "zcxMPs3MTDNzEw...zw+zcxMPs3MTD4=" } ], "input": [ { "name": "LayerNormalization2D_input", "type": { "tensorType": { "elemType": 1, "shape": { "dim": [ { "dimValue": "20" }, { "dimValue": "5" }, { "dimValue": "10" }, { "dimValue": "10" } ] } } } } ], "output": [ { "name": "LayerNormalization2D_output", "type": { "tensorType": { "elemType": 1, "shape": { "dim": [ { "dimValue": "20" }, { "dimValue": "5" }, { "dimValue": "10" }, { "dimValue": "10" } ] } } } } ] }, "opsetImport": [ { "domain": "", "version": "17" } ] } |
-
各値の意味 – 公式の仕様に書かれていない情報も追記
Key Value irVersion ONNXのIRフォーマットのバージョン番号 producerName モデルを生成するために使用したツールの名前 producerVersion モデルを生成するために使用したツールのバージョン graph モデルのグラフ本体の定義 Key Value node オペレーションの入出力の接続関係をリスト形式で表現 name グラフの名前 initializer オペレーションに含まれる定数、 Convの重みやテンソルの形状Key Value dims 定数の形状、Numpyのndarrayの各次元のサイズ dataType 定数のデータ型、 inputのelemTypeを参照name 定数の名前 rawData Float32やFloat16、Int8などの各種精度の
Numpy.ndarrayがBase64 エンコードされた値
Float32:[1,2,3,4] AACAPwAAAEAAAEBAAACAQA==
Int64:[1,2] AQAAAAAAAAACAAAAAAAAAA==input 入力変数、一部省略 Key Value elemType 変数のデータ型 Type Values Type Values float16 10 int8 3 float32 1 int16 5 float64 11 int32 6 bool 9 int64 7 uint8 2 uint16 4 uint32 12 uint64 13 dim dimValue: 数値、固定形状
dimParam: 文字列、可変形状output 出力変数、’input’と同じ opsetImport opsetのドメイン名とopsetのバージョン番号 Key Value domain ドメイン名 version バージョン番号 ドメイン名は
ai.onnx vXX
com.microsoft v1
com.microsoft.nchwc v1
ai.onnx.training v1
ai.onnx.preview.training v1
com.microsoft.experimental v1
など
ONNXのJSONを手で書き換えて保存し、再びONNXファイルへ戻すテクニックは後続の章で取り上げます。ちなみに、Numpy.ndarrayをBase64エンコードした値を知りたい場合は sed4onnx を使用すると簡単です。
|
1 2 3 4 5 |
sed4onnx --constant_string [1,2] --dtype int64 --mode encode AQAAAAAAAAACAAAAAAAAAA== sed4onnx --constant_string AQAAAAAAAAACAAAAAAAAAA== --dtype int64 --mode decode [1,2] |
畳み込みの重みやバイアス、Normalizationのバイアスなどは全てこのルールに則って参照・書き換えが可能です。
なお捕捉ですが、dimValue と dimParam の用法は下記のイメージです。例えば、バッチサイズが可変の定義 N のときは "dimParam: "N" となります。dimParam が指定された形状部分は未定義の次元として任意の文字列を指定することができます。サンプルは N を例示しましたが、batch_size でも良いですし、abcdefg でも -1 でも問題ありません。指定された値は全てただの表示用の文字列として扱われる仕様です。dimValue を使用する場合は正の整数のみ指定可能です。従って、-1 は文字列扱いとなりますので指定できません。
|
1 2 3 4 5 6 7 8 9 10 11 12 13 14 15 16 17 18 19 20 |
"input": [ { "name": "Abs_input", "type": { "tensorType": { "elemType": 1, "shape": { "dim": [ { "dimParam": "N" }, { "dimValue": "100" } ] } } } } ], |
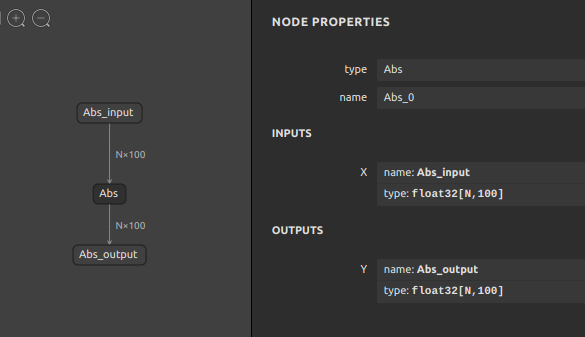
実は、ココまでの基本が押さえられていればJSONをIDEで手書きしてONNXモデルをフルスクラッチで生成することが可能です。ただ、現実的にはJSONをゼロから書き上げるのは辛いですので、すでに手元にあるONNXファイルを微改造する程度のシチュエーションのほうが多いかもしれません。また運用上、モデルのチューニングを自動化するなどの要件がある場合は手書きはナンセンスですので、後続の章でご紹介するようなモデル加工用のツールをシェルで連続的に実行して自動化するのが現実的です。
5-2. onnx-graphsurgeon
ONNXモデルの構造を把握できたところで、この章以降で多用するとても重要で便利なツールをご紹介しておきます。NVIDIAさんが公開してくれている onnx-graphsurgeon というツールです。TensorRTの附属ツールとして公開されているため少し見つけ出しにくい場所にリソースが存在していますが、nvidia-pyindex というパッケージインデックスを介してpipパッケージを取得することができます。3章の手順を実行している場合はすでに導入済みになっています。surgeon は 外科医 と日本語訳され、その名のイメージの通りONNXのモデル(グラフ)を切除したり結合したりと自由自在に加工することができます。モデル加工のチュートリアルが数種類コミットされていますので、ご興味が有る方は examples フォルダを覗いてみると良いと思います。ただ、このツールの仕様や使い方をマスターすることがこのブログの本質ではないため、後続の章でご紹介するテクニックではこのツールを皆さんが直接呼び出すことはありません。全て自作ツールでラップして分かりにくい仕様部分をブラックボックス化した状態で利用します。
便利ですが、Pythonでソースコードを書いて onnx_graphsurgeon を適切に呼び出してモデルを生成したり加工する必要があります。ツールの仕様を理解することにコストを掛けたくないのが人情ですが、理解しておくと自作ツールを作成したりよりトリッキーな加工を行いたい要件が出てきたときに役に立つ時があるかもしれません。従いまして、onnx_graphsurgeon の examples の中のチュートリアルのひとつだけをココではご紹介します。
- 01_creating_a_model
1234567891011import onnx_graphsurgeon as gsimport numpy as npimport onnxOPSET=11X = gs.Variable(name="X", dtype=np.float32, shape=(1, 3, 5, 5))Y = gs.Variable(name="Y", dtype=np.float32, shape=(1, 3, 1, 1))node = gs.Node(op="GlobalLpPool", attrs={"p": 2}, inputs=[X], outputs=[Y])graph = gs.Graph(nodes=[node], inputs=[X], outputs=[Y], opset=OPSET)onnx.save(gs.export_onnx(graph), f"GlobalLpPool_{OPSET}.onnx")
上記のソースコードを任意の .py ファイルとして保存して実行すると、下図のようなモデルが生成されます。
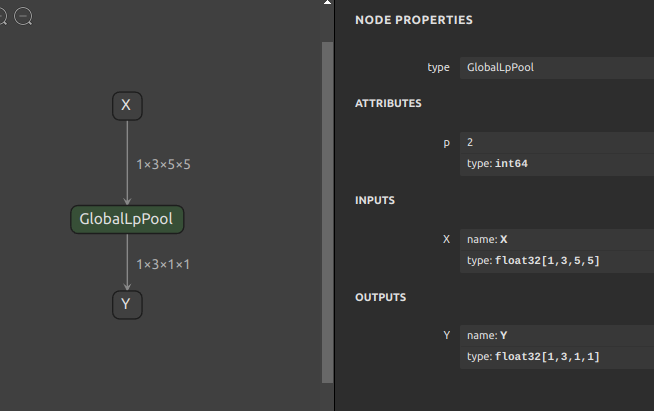
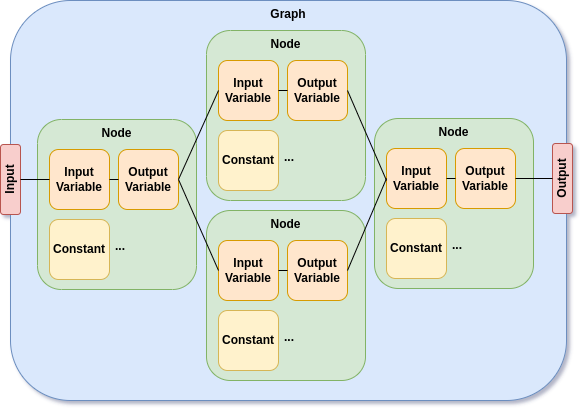
READMEに該当するドキュメントにはほとんど説明が書かれていないため、初見では意味が分からないことが多いと思います。onnx_graphsurgeon の構成要素をまずはご紹介します。
| 要素 | 概要 |
|---|---|
| onnx_graphsurgeon.Graph | ONNXのgraphに相当、Nodeを連結したモデル全体構造を表す |
| onnx_graphsurgeon.Node | ONNXのnodeに相当、opとattrsとinputsとoutputsで構成、ひとつひとつのオペレーションに該当、opに指定可能な名前およびattrに指定可能な属性値および入力数と出力数は Operator Schemas を参照 |
| onnx_graphsurgeon.Variable | ONNXのinputとoutputに相当、nameとdtypeとshapeで構成、オペレーションの変数部分 |
| onnx_graphsurgeon.Constant | ONNXのinitializerに相当nameとdtypeとshapeとvaluesで構成、オペレーションの定数部分 |
Pythonのコードは小さな変数 Variable や定数 Constant から定義を初めて Variable を介して Node 間を結合していき、Graph を生成するイメージです。オペレーションごとにONNXの仕様に則って全ての変数や定数をあらかじめ定義しておく必要があり少々直感的ではありませんが、簡単なコードを書くことでモデルを構築できる雰囲気はご理解いただけると思います。
onnx.save(gs.export_onnx(graph), "test_globallppool.onnx") の部分で onnx_graphsurgeon.Graph 形式のオブジェクトをONNXファイルとして出力しています。gs.export_onnx(graph) の部分は onnx.ModelProto という、ONNXファイルへ出力可能な Protocol Buffers 形式のオブジェクトを生成してくれています。onnx.save(...) はONNXの標準APIの save メソッドに onnx.ModelProto を引き渡しているだけです。
ここで繰り返しになりますが、便利で柔軟な対応が可能なツールではありますが、このツールの仕様を覚えることが本質ではありません。
5-3. Node生成
前述の onnx_graphsurgeon を使用してPythonのソースコードを書いて実行すれば簡単にONNXのモデルを生成できることはご理解いただけたかと思います。しかし、そもそもPythonのソースコードを書きたくないです。できればシェルで期待通りのオペレーションをポンッと生成したいです。細々としたソースコードを書く数十分の時間すら惜しいです。そこで、onnx_graphsurgeon をラップしてシェル操作だけでONNXのノードを生成できる sog4onnx というツールを作成しましたのでそちらを使用してNode生成を行ってみます。

Nodeを生成するために把握しなければいけないのはONNXのオペレーションの仕様です。GlobalLpPool の仕様はこちらです。GlobalLpPool 読んでいただくと分かるとおり、特に難しいことをしているオペレーションでは無さそうです。入力にひとつの値と属性値 p をとり、出力はひとつの値となるようです。属性値Attributes p は Int64、入力Variable X は Float16 又は Float32 又は Float64、出力Variable Y は Float16 又は Float32 又は Float64 の型のみが許容されるようです。
- GlobalLpPool の仕様
1234567891011121314151617181920212223242526272829303132GlobalLpPool-2GlobalLpPool consumes an input tensor X and applies lp pool pooling acrossthe values in the same channel. This is equivalent toLpPool with kernel size equal to the spatial dimension of input tensor.- VersionThis version of the operator has been available since version 2of the default ONNX operator set.- Attributesp : int (default is 2)p value of the Lp norm used to pool over the input data.- InputsX (differentiable) : TInput data tensor from the previous operator; dimensionsfor image case are (N x C x H x W), where N is the batch size,C is the number of channels, and H and W are the height andthe width of the data. For non image case, the dimensions arein the form of (N x C x D1 x D2 ... Dn), where N is the batch size.- OutputsY (differentiable) : TOutput data tensor from pooling across the input tensor.The output tensor has the same rank as the input.The first two dimensions of output shape are the sameas the input (N x C), while the other dimensions are all 1.- Type ConstraintsT : tensor(float16), tensor(float), tensor(double)Constrain input and output types to float tensors.
では前節で onnx_graphsurgeon を使用して生成したオペレーションと同じ内容のオペレーションを sog4onnx を使用して生成してみます。
|
1 2 3 4 5 6 7 8 |
sog4onnx \ --op_type GlobalLpPool \ --opset 11 \ --op_name GlobalLpPool1 \ --input_variables X float32 [1,3,5,5] \ --output_variables Y float32 [1,3,1,1] \ --attributes p int64 2 \ --output_onnx_file_path GlobalLpPool_11_sog.onnx |
生成できました。onnx_graphsurgeon で生成したモデルと同じです。バックエンドで onnx_graphsurgeon をコールしていることには変わりありませんが記述量が大幅に減りました。より直感的にONNXのオペレーションを生成できます。またシェルスクリプトへ記述して機械的に、連続的にオペレーションを生成することができます。
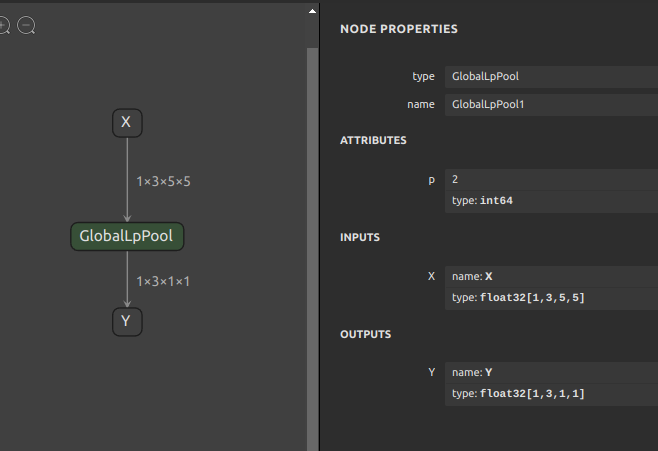
念の為ツールの仕様を記載します。op_type、opset、op_name、input_variables、output_variables、attributes そして output_onnx_file_path を必要数分だけ順番に指定していくだけです。
- コマンドラインインタフェース
1234567891011121314151617181920212223242526272829303132333435363738394041424344454647484950515253545556575859606162636465666768sog4onnx -husage: sog4onnx [-h]--ot OP_TYPE--os OPSET--on OP_NAME[-iv NAME TYPE VALUE][-ov NAME TYPE VALUE][-a NAME DTYPE VALUE][-of OUTPUT_ONNX_FILE_PATH][-n]optional arguments:-h, --helpshow this help message and exit-ot OP_TYPE, --op_type OP_TYPEONNX OP type.https://github.com/onnx/onnx/blob/main/docs/Operators.md-os OPSET, --opset OPSETONNX opset number.-on OP_NAME, --op_name OP_NAMEOP name.-iv INPUT_VARIABLES INPUT_VARIABLES INPUT_VARIABLES,--input_variables INPUT_VARIABLES INPUT_VARIABLES INPUT_VARIABLESinput_variables can be specified multiple times.--input_variables variable_name numpy.dtype shapehttps://github.com/onnx/onnx/blob/main/docs/Operators.mde.g.--input_variables i1 float32 [1,3,5,5] \--input_variables i2 int32 [1] \--input_variables i3 float64 [1,3,224,224]-ov OUTPUT_VARIABLES OUTPUT_VARIABLES OUTPUT_VARIABLES,--output_variables OUTPUT_VARIABLES OUTPUT_VARIABLES OUTPUT_VARIABLESoutput_variables can be specified multiple times.--output_variables variable_name numpy.dtype shapehttps://github.com/onnx/onnx/blob/main/docs/Operators.mde.g.--output_variables o1 float32 [1,3,5,5] \--output_variables o2 int32 [1] \--output_variables o3 float64 [1,3,224,224]-a ATTRIBUTES ATTRIBUTES ATTRIBUTES, --attributes ATTRIBUTES ATTRIBUTES ATTRIBUTESattributes can be specified multiple times.dtype is one of "float32" or "float64" or "int32" or "int64" or "str".--attributes name dtype valuehttps://github.com/onnx/onnx/blob/main/docs/Operators.mde.g.--attributes alpha float32 1.0 \--attributes beta float32 1.0 \--attributes transA int32 0 \--attributes transB int32 0-of OUTPUT_ONNX_FILE_PATH, --output_onnx_file_path OUTPUT_ONNX_FILE_PATHOutput onnx file path.If not specified, a file with the OP type name is generated.e.g. op_type="Gemm" -> Gemm.onnx-n, --non_verboseDo not show all information logs. Only error logs are displayed.
- Pythonスクリプトから利用する場合
123456789101112131415161718192021222324252627282930313233343536373839404142434445464748495051525354555657585960616263646566676869707172737475767778798081828384858687>> from sog4onnx import generate>>> help(generate)Help on function generate in module sog4onnx.onnx_operation_generator:generate(op_type: str,opset: int,op_name: str,input_variables: dict,output_variables: dict,attributes: Union[dict, NoneType] = None,output_onnx_file_path: Union[str, NoneType] = '',non_verbose: Union[bool, NoneType] = False) -> onnx.onnx_ml_pb2.ModelProtoParameters----------op_type: strONNX op type.See below for the types of OPs that can be specified.https://github.com/onnx/onnx/blob/main/docs/Operators.mde.g. "Add", "Div", "Gemm", ...opset: intONNX opset number.e.g. 11op_name: strOP name.input_variables: Optional[dict]Specify input variables for the OP to be generated.See below for the variables that can be specified.https://github.com/onnx/onnx/blob/main/docs/Operators.md{"input_var_name1": [numpy.dtype, shape], "input_var_name2": [dtype, shape], ...}e.g.input_variables = {"name1": [np.float32, [1,224,224,3]],"name2": [np.bool_, [0]],...}output_variables: Optional[dict]Specify output variables for the OP to be generated.See below for the variables that can be specified.https://github.com/onnx/onnx/blob/main/docs/Operators.md{"output_var_name1": [numpy.dtype, shape], "output_var_name2": [dtype, shape], ...}e.g.output_variables = {"name1": [np.float32, [1,224,224,3]],"name2": [np.bool_, [0]],...}attributes: Optional[dict]Specify output attributes for the OP to be generated.See below for the attributes that can be specified.When specifying Tensor format values, specify an array converted to np.ndarray.https://github.com/onnx/onnx/blob/main/docs/Operators.md{"attr_name1": value1, "attr_name2": value2, "attr_name3": value3, ...}e.g.attributes = {"alpha": 1.0,"beta": 1.0,"transA": 0,"transB": 0}Default: Noneoutput_onnx_file_path: Optional[str]Output of onnx file path.If not specified, no .onnx file is output.Default: ''non_verbose: Optional[bool]Do not show all information logs. Only error logs are displayed.Default: FalseReturns-------single_op_graph: onnx.ModelProtoSingle op onnx ModelProto
5-4. Nodeのコンポーネント化
前節で単体のオペレーションを生成するだけの操作に何の意味があるのか疑問を持たれた方が多いと思います。たしかにオペレーション単体のモデルでは特にメリットを感じませんが、複数のオペレーションを生成して結合し、前処理や後処理をコンポーネント化してストックしておけるとしたらどうでしょうか。PyTorchで前処理・後処理を記述することと何ら変わりはありませんが、コンポーネント化した定型的な前処理・後処理をONNXファイルとしてあらかじめ生成しておき、モデル本体部分がどのようなものに変わってもその前後の処理はあとからシェルでマージできるようになります。また、実はPyTorchで表現できないオペレーションにも対応することができるようになりますし、元のモデルがPyTorchから生成されたものではなくなおかつトレーニングコードが公開されていないモデルの改造時に役に立ちます。
コンポーネント化がどのようなことを指すのかはこちらをご覧ください。components_of_onnx READMEの下部 Progress の部分は折りたたみになっており、展開するとコンポーネント化済みのONNXがコミットされていることが分かります。
文脈として読みづらいと思いますので、一部分を抜粋してこちらに転記します。各種ハードウェア向けの特殊構造をあらかじめ実装していたり、PyTorch (TorchVision) では実装不可能なオペレーションを生成したり、定型的なノーマライゼーションの処理、RGB<->BGR変換処理を生成してコミットしています。
-
ONNXの特殊コンポーネントの一部
No. Operator Structure Z001 Normalization_rgb_imagenet 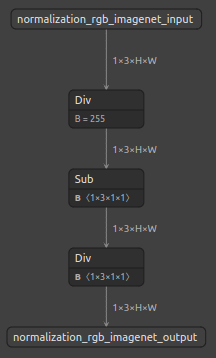
Z002 Normalization_bgr_imagenet 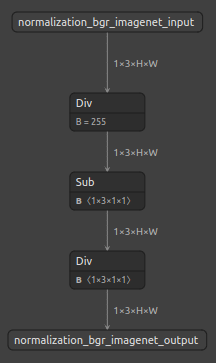
Z003 SingleClass_NonMaxSupression 480×640 Z004 YOLACT_Edge_NonMaxSupression 550×550
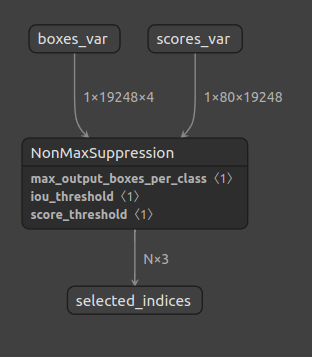
Z005 Resize_0.5×0.5 1x3xHxW->1x3x(Hx0.5)x(Wx0.5)
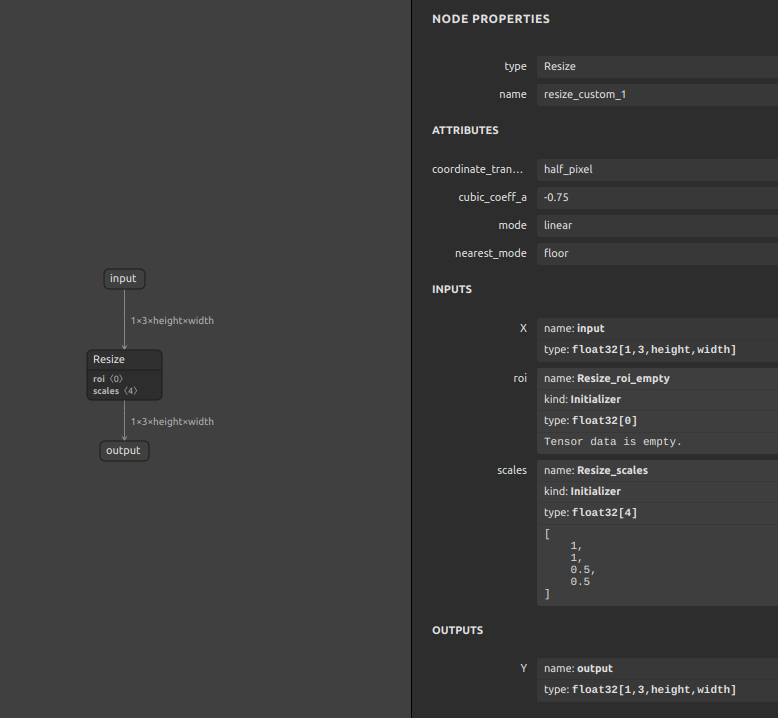
Z006 Resize_HxW 1x3xHxW->1x3x(Hx?)x(Wx?)
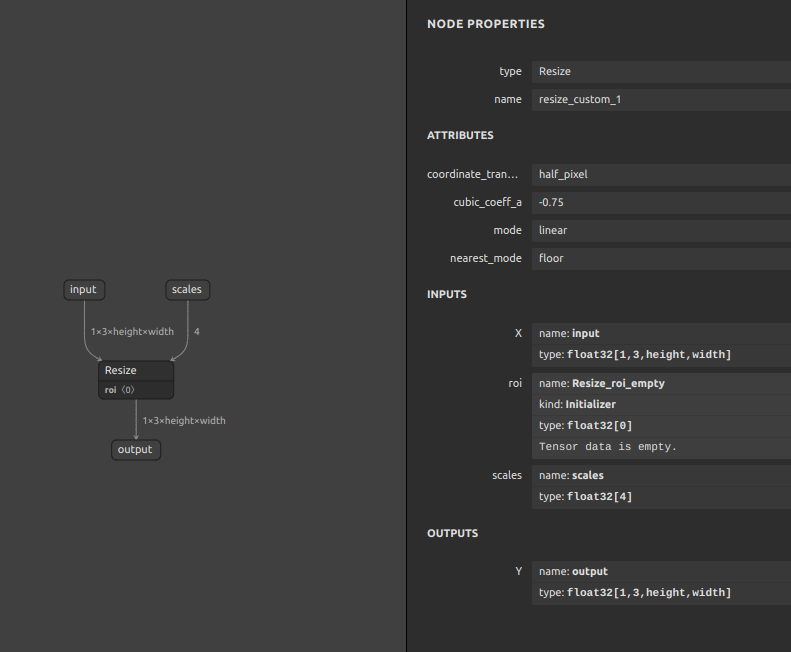
Z007 Myriad_workaround_NonMaxSuppression 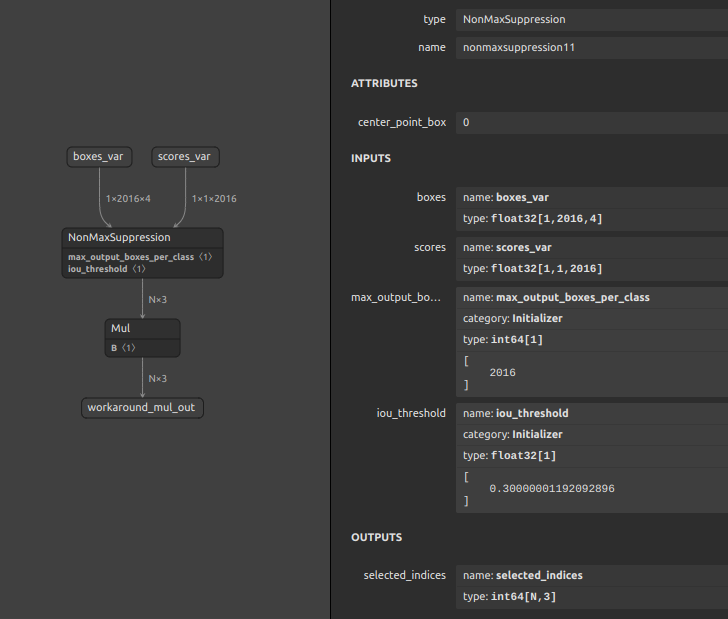
Z008 TensorRT_compatible_N_batch_Resize 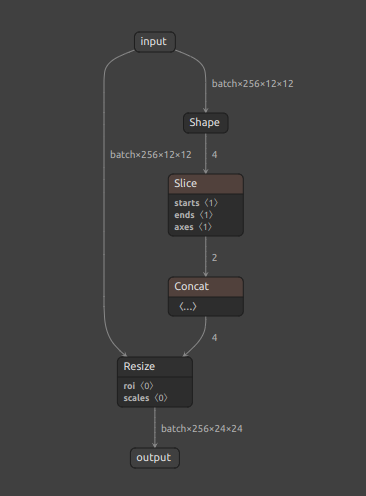
Z009 Unity_Barracuda_compatible_GatherND 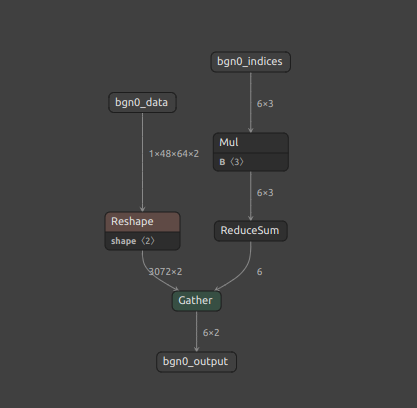
Z010 Unity_Barracuda_compatible_Split 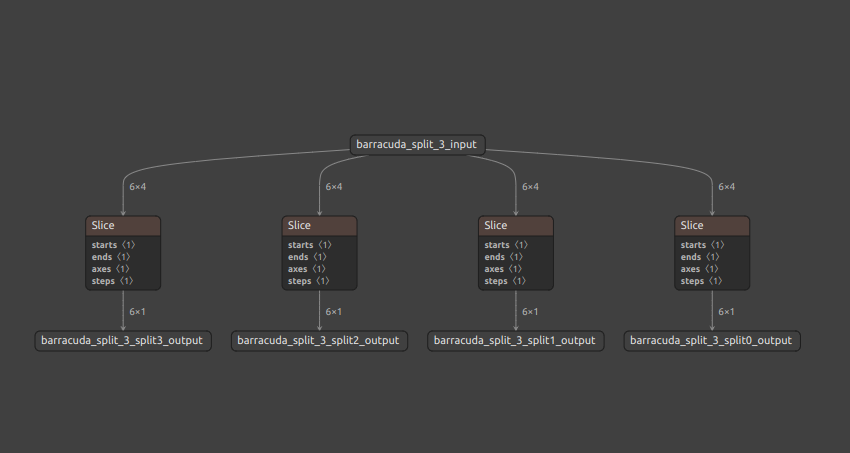
では、単体のオペレーションではなく、オペレーションのセット(コンポーネント)を生成する方法をご紹介します。方法は大きく2つです。
- PyTorchで必要なオペレーションセットの部分のみをモデル化してONNXへエクスポート
- ONNXの単体オペレーションを複数種類生成しておいてあとからマージ
それぞれの方法にメリット・デメリットがあります。
| 生成方法 | メリット | デメリット |
|---|---|---|
| PyTorch | 1. 総じてモデルを組み立てやすい 2. Numpyの構文を使える 3. 認知されていてサンプルが多い |
1. 本質的ではないロジックを書く必要がある 2. 生成できないオペレーションがある 3. 未対応処理、改善提案の反映が Meta あるいは Microsoft、(Linux Foundation) のエンジニアの気分次第 4. PyTorchおよびONNX Exporterのオプティマイザの影響を受ける |
| ONNX単体 | 1. PyTorchで生成できないオペレーションを生成できる 2. ソースコードが書けなくてもモデルを作れる 3. PyTorchおよびONNX Exporterのオプティマイザの影響を受けない |
1. オペレーションの数が多くなると結合作業が手間 2. 簡単に壊れる 3. Microsoftによる仕様改善のスピードが早すぎる |
上記の中からPyTorchを経由するとできなくてもONNXならできることを取り上げます。ONNXの特殊コンポーネントの一部 のうち、一番分かりやすいものとして Z004 の Multi-Class NonMaxSupression が該当します。と言われてもピンとこないと思いますので実例を取り上げてご説明します。
まずVision系のモデルの後処理でよく利用されるオペレーション NMS の PyTorch(TrochVision) の仕様を見てみます。Torch Vision NMS あるいは Kornia NMS ここで、Kornia の詳細には触れませんが、PyTorch向けに開発されたとても便利なメソッド群です。PyTorchでフォローできていないオペレーションが大量に提供されています。

- TorchVision NMSの仕様
12345678910111213141516171819202122232425262728NMStorchvision.ops.nms(boxes: Tensor, scores: Tensor, iou_threshold: float) → Tensor[SOURCE]Performs non-maximum suppression (NMS) on the boxes according totheir intersection-over-union (IoU).NMS iteratively removes lower scoring boxes which have an IoUgreater than iou_threshold with another (higher scoring) box.If multiple boxes have the exact same score and satisfythe IoU criterion with respect to a reference box,the selected box is not guaranteed to be the same between CPU and GPU.This is similar to the behavior of argsort in PyTorch when repeated values are present.Parameters:boxes (Tensor[N, 4]))boxes to perform NMS on.They are expected to be in (x1, y1, x2, y2) formatwith 0 <= x1 < x2 and 0 <= y1 < y2.scores (Tensor[N])scores for each one of the boxesiou_threshold (float)discards all overlapping boxes with IoU > iou_thresholdReturns:int64 tensor with the indices of the elements that have been kept by NMS,sorted in decreasing order of scoresReturn type:Tensor
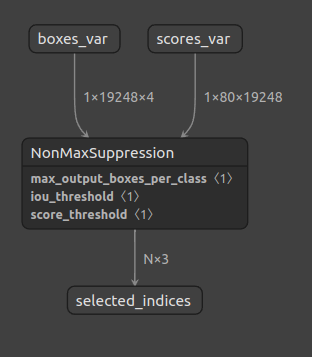
何が問題なのでしょうか? バッチ処理およびマルチクラスに対応していないことです。では、バッチ処理およびマルチクラスに対応していないとはどういうことか。boxes と scores の入力テンソルの次元がひとつ、あるいは2つ足りないです。ほとんどのシチュエーションでは不要かもしれませんが、NMSの仕様がこうなっているがゆえにとても扱いづらいシチュエーションが存在します。実際は正確に同じシチュエーションを表現している図ではありませんが下図のイメージです。NMSが80個分(80クラス分)横に展開されています。
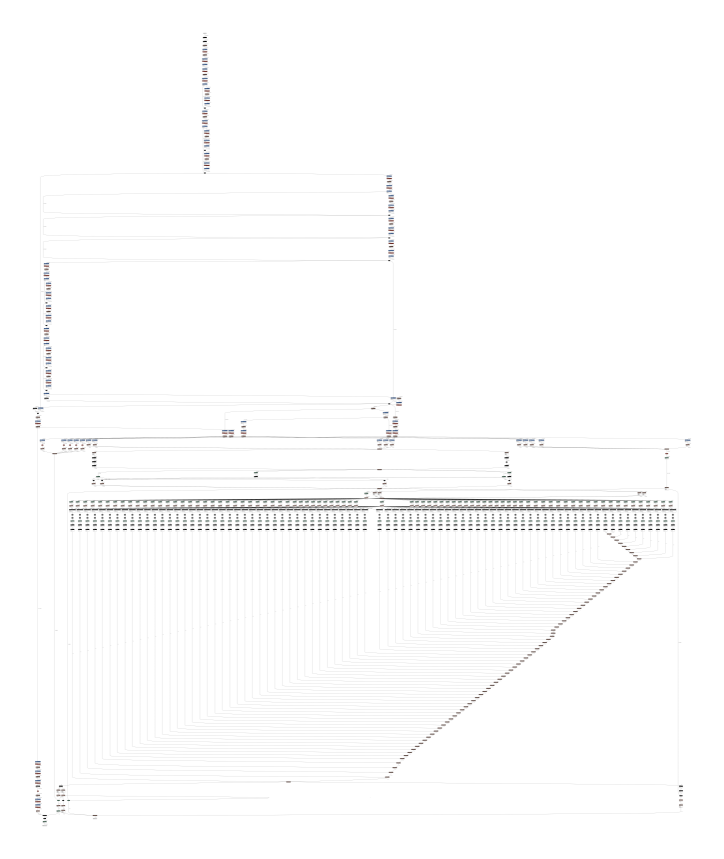
ONNXのNMSはこうです。バッチ処理およびマルチクラス処理に対応しています。余談ですが、TensorFlow のNMSもバッチ処理に対応しています。PyTorchはTensorFlowより圧倒的に扱いやすいのは事実ですが、かゆいところに手が届きません。
|
1 2 3 4 5 6 7 8 9 10 11 12 13 14 15 16 17 18 19 20 21 22 23 24 25 26 27 28 29 30 31 32 33 34 35 36 37 38 39 40 41 42 43 44 45 46 47 48 49 50 51 52 |
NonMaxSuppression-11 Filter out boxes that have high intersection-over-union (IOU) overlap with previously selected boxes. Bounding boxes with score less than score_threshold are removed. Bounding box format is indicated by attribute center_point_box. Note that this algorithm is agnostic to where the origin is in the coordinate system and more generally is invariant to orthogonal transformations and translations of the coordinate system; thus translating or reflections of the coordinate system result in the same boxes being selected by the algorithm. The selected_indices output is a set of integers indexing into the input collection of bounding boxes representing the selected boxes. The bounding box coordinates corresponding to the selected indices can then be obtained using the Gather or GatherND operation. - Version This version of the operator has been available since version 11 of the default ONNX operator set. - Attributes center_point_box : int (default is 0) Integer indicate the format of the box data. The default is 0. 0 the box data is supplied as [y1, x1, y2, x2] where (y1, x1) and (y2, x2) are the coordinates of any diagonal pair of box corners and the coordinates can be provided as normalized (i.e., lying in the interval [0, 1]) or absolute. Mostly used for TF models. 1 - the box data is supplied as [x_center, y_center, width, height]. Mostly used for Pytorch models. - Inputs (2 - 5) boxes : tensor(float) An input tensor with shape [num_batches, spatial_dimension, 4]. The single box data format is indicated by center_point_box. scores : tensor(float) An input tensor with shape [num_batches, num_classes, spatial_dimension] max_output_boxes_per_class (optional) : tensor(int64) Integer representing the maximum number of boxes to be selected per batch per class. It is a scalar. Default to 0, which means no output. iou_threshold (optional) : tensor(float) Float representing the threshold for deciding whether boxes overlap too much with respect to IOU. It is scalar. Value range [0, 1]. Default to 0. score_threshold (optional) : tensor(float) Float representing the threshold for deciding when to remove boxes based on score. It is a scalar. - Outputs selected_indices : tensor(int64) selected indices from the boxes tensor. [num_selected_indices, 3], the selected index format is [batch_index, class_index, box_index]. |
話が少し逸れましたが、オペレーションをコンポーネント化できる、ということにおいて、PyTorchから実質的に綺麗なオペレーションを生成できない部分を部品化したあとに単純な前後処理をマージしておくことで、いつも定型的にコーディングしている後処理・前処理を事前にストックしておいて再利用できる、というメリットの部分の雰囲気はご理解頂けたのではないでしょうか。ただし注意点は、たとえONNXの仕様上対応しているオペレーションであったとしてもTensorRTなどの他のフレームワーク側では対応していないことがあるという点ぐらいです。
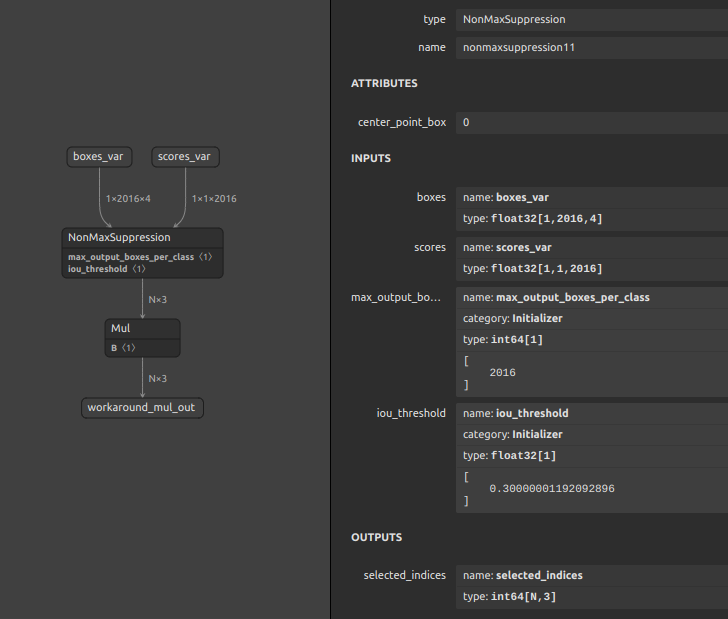
余談ですが、下図はバッチ処理とマルチクラスに対応したNMSをMyriad向けにカスタムしたコンポーネントの一例です。フレームワーク側のバグをONNXのモデル構造でフォローすることができます。MyriadはNMSに対応しているにも関わらず、NMSの出力の型がINT64のままだとAbortするバグがありますので、NMSの直後にダミーの Mul をマージしておくだけでAbortを回避できるトリックがあります。これ以外にも特定のオペレーションの型変換のバグの回避など、挙げ始めるとキリがないためこれぐらいにしておきます。
6. ONNXモデルのチューニング [基礎]
この章では、PyTorchから生成したONNXあるいは直接生成したONNXの構造を機械的に最適化する方法ならびに手動で構造を書き換えて処理フローを変更する方法をご紹介します。
6-1. onnx-simplifierによる最適化
4章でも少しだけ触れた onnx-simplifier の基本動作および最適化の挙動をご紹介します。
コマンドラインインタフェースで使用する場合の基本構文は下記のとおりです。
|
1 |
onnxsim input.onnx output.onnx |
たったこれだけを実行することでONNXのモデル構造を大幅に最適化し、場合によってはファイルサイズを大幅に削減してくれます。onnxsim を実行したときに内部で処理してくれる最適化の動きと注意点を下記の流れでご説明します。
BatchNormalizationの融合- オペレーションの定数変換と埋め込み
- 形状推定
- 使用するうえでのテクニック
TileとGatherElementsのコンビネーションによるモデル肥大化の話
6-1-1. BatchNormalization の融合
BatchNormalization 自体はそんなに複雑な処理をしていません。定型的な処理を担っているだけで、特に推論時にはオペレーションとしてモデルの中に存在している意義があまりありません。ONNXの公式仕様に書かれている BatchNormalization の演算仕様を拝借します。
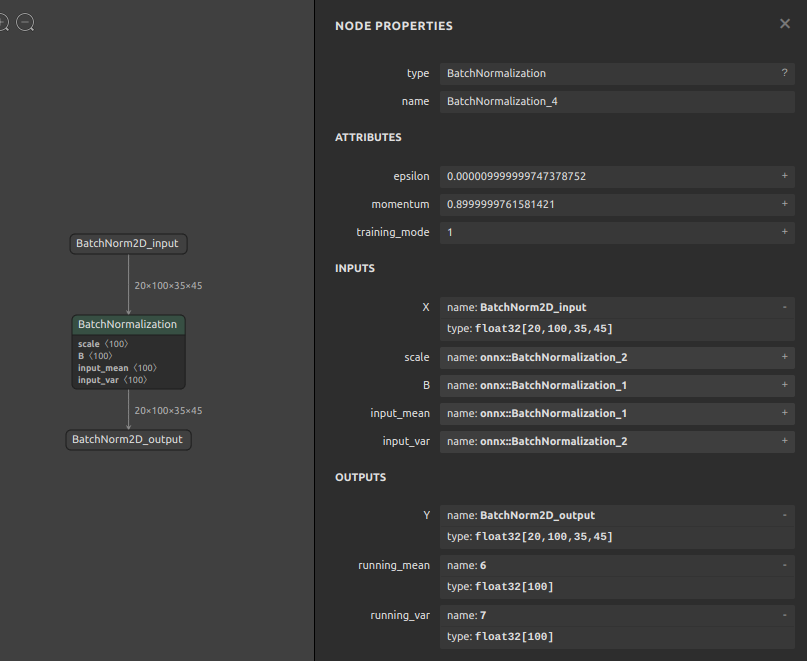
|
1 |
output = (input_tensor - input_mean) / sqrt(input_var + epsilon) * scale + bias |
入力値から平均値を引き算して分散のルートで割り算し、スケールを掛け算してバイアスを足しています。(数式をただ日本語にしただけです)epsilon はゼロ除算エラー防止のための微小な数値です。なお、input_mean と input_var と epsilon と scale と bias はトレーニング終了時点で確定しており全て定数になっている前提です。つまり、input_tensor 以外の数値は全て定数であり、前後のオペレーション(Convolution) などが保持している定数値と事前に足し掛けすることで BatchNormalization オペレーションそのものを無効化することができます。このあたりの考え方は私以外の世界中の方々が昔から解説記事などを沢山書かれていますので、詳しいことは先人の方々が書かれた記事をご覧ください。
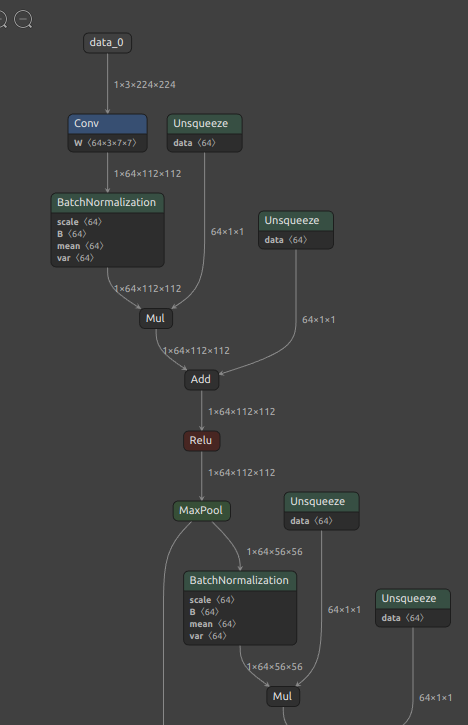
ここでお伝えしたいのは、難しい BatchNormalization の前後オペレーションとの融合処理を onnx-simplifier が全て代行して自動で処理してくれる、ということです。下図に例示します。
| Before | After |
|---|---|
 |
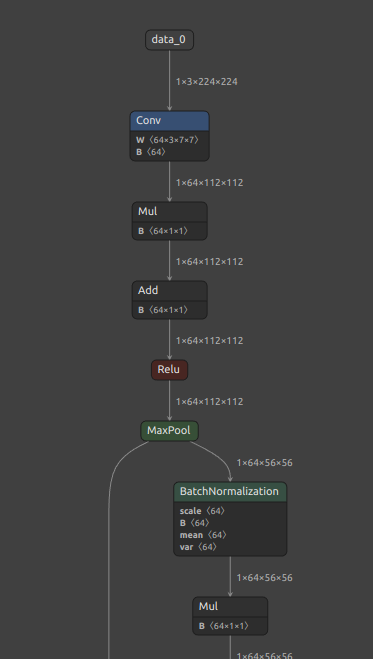 |
Conv の直後にある BatchNormalization が Conv に融合して無くなりました。しかし、画像右下の BatchNormalization は Conv 周辺には無いため融合も分解もされずそのまま残りました。この点は少し手を加えることで単純な Mul と Sub と Add に分離でき、ときには Mul と Add のみに分離することができますがここでは説明しません。BatchNormalization を分解することで内部的な演算回数を削減することができます。
6-1-2. オペレーションの形状推定と定数変換と埋め込み
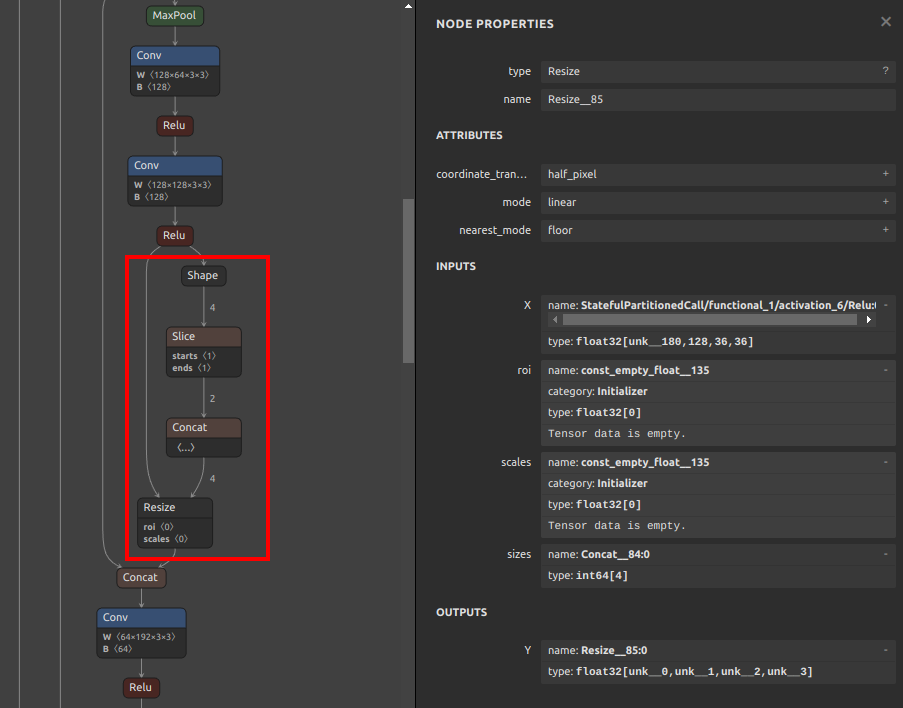
事前に演算しておけるオペレーションは onnx-simplifier が定数に置き換えてくれます。前述の図の Unsqueeze や Constant、ConstantOfShape、Tile などです。Vision系のモデルで特に多いのが、Resize 後のサイズ、あるいはリサイズのスケール値を推定する処理部分の Resize オペレーションへの埋め込みです。
| Before | After |
|---|---|
 |
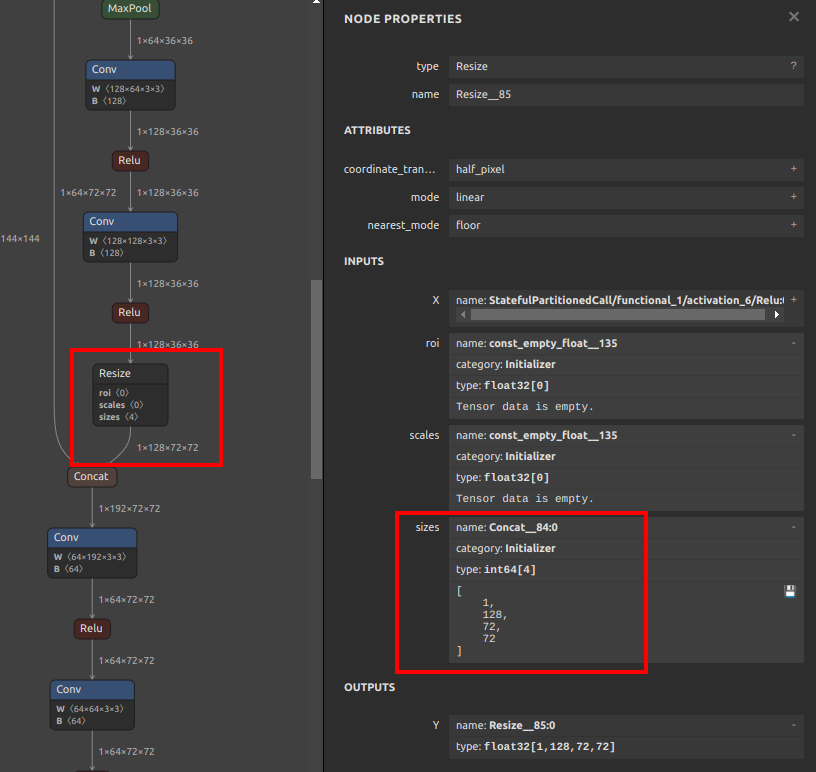 |
Resize オペレーションの直前にあった Shape と Slice と Concat の3つのオペレーションから事前にResize形状を計算し、Resize オペレーションの size の Initializer に定数として埋め込まれました。このような動作は Resize に限ったことではなく最適化の過程で事前計算可能な部分は定数に置き換えて埋め込むことでモデル全体の演算量を減らしてくれます。最近流行りの Diffusion モデルなど全体構造が大きなモデルほど効果が大きくなりますが、onnx-simplifier の最適化処理に数時間掛かったり何日も掛かったりすることがあります。
6-1-3. 使用するうえでのテクニック
モデルの構造が極めて大きく、なおかつ形状推定と最適化によって定数化できるオペレショーンの数が非常に多い場合 (例としてモデル全体で数万オペレーションある場合など) は1度の最適化処理で構造を最適化しきれない場合があります。したがって、onnx-simplifier は定型的に3回〜5回実行することをおすすめします。
Hugging Face にコミットされている Stable Diffusion の vae_encoder.onnx を例にとります。合計で3回 onnxsim を実行し、2回目までモデル全体のオペレーションの総数とモデルサイズがシュリンクしていることが分かります。冗長な計算を行っているオペレーションをモデルからほぼ一掃してくれました。

最適化前と最適化後でどれほど差が出ているかをモデル構造を分析することのみに特化したツール ssc4onnx を使用して計測してみます。onnx-simplifier の構造分析部分のロジックを独自に改善し、分析処理を内部的に10倍以上高速化していることと、オペレーションの総数をカウントして表示できるように改良したツールです。onnx-simplifier は巨大な構造を持つモデルを最適化する過程でAbortすることがありますが、このツールはAbortしません。

- コマンドラインインタフェース
123456789101112ssc4onnx -husage:ssc4onnx [-h]-if INPUT_ONNX_FILE_PATHoptional arguments:-h, --helpshow this help message and exit.-if INPUT_ONNX_FILE_PATH, --input_onnx_file_path INPUT_ONNX_FILE_PATHInput onnx file path.
- Pythonスクリプトから利用する場合
12345678910111213141516171819202122232425262728>>> from ssc4onnx import structure_check>>> help(structure_check)Help on function structure_check in module ssc4onnx.onnx_structure_check:structure_check(input_onnx_file_path: Union[str, NoneType] = '',onnx_graph: Union[onnx.onnx_ml_pb2.ModelProto, NoneType] = None) -> Tuple[Dict[str, int], int]Parameters----------input_onnx_file_path: Optional[str]Input onnx file path.Either input_onnx_file_path or onnx_graph must be specified.Default: ''onnx_graph: Optional[onnx.ModelProto]onnx.ModelProto.Either input_onnx_file_path or onnx_graph must be specified.onnx_graph If specified, ignore input_onnx_file_path and process onnx_graph.Returns-------op_num: Dict[str, int]Num of every opmodel_size: intModel byte size
実に 269個 のオペレーションが最適化の過程で削除されました。
-
最適化前

-
最適化後

6-1-4. Tile と GatherElements のコンビネーションによるモデル肥大化の話
onnx-simplifier の最適化の仕組みが事前演算によるオペレーションの定数化であることはご紹介しました。ここではその最適化仕様が裏目になってモデルサイズが超肥大化し、Protocol Buffers のファイルサイズ上限の 2GB を超えるほど肥大化してAbortしてしまう事例があることをご紹介します。
モデル肥大化の原因と対処方法を onnx-simplifier の作者と議論し、現状の最新バージョン v0.4.8 では提案内容が取り込まれてモデルサイズの肥大化が抑止される仕様が盛り込まれた状態になっていますが、諸刃の剣の対処であることを理解しつつ、現状ではデフォルト動作で Tile の最適化がスキップされるように修正されています。気になる方はこちらの issue Excessive bloating of ONNX files due to over-efficient conversion of “Tile” to constants (Protocol Buffers .onnx > 2GB) #178 をご覧ください。
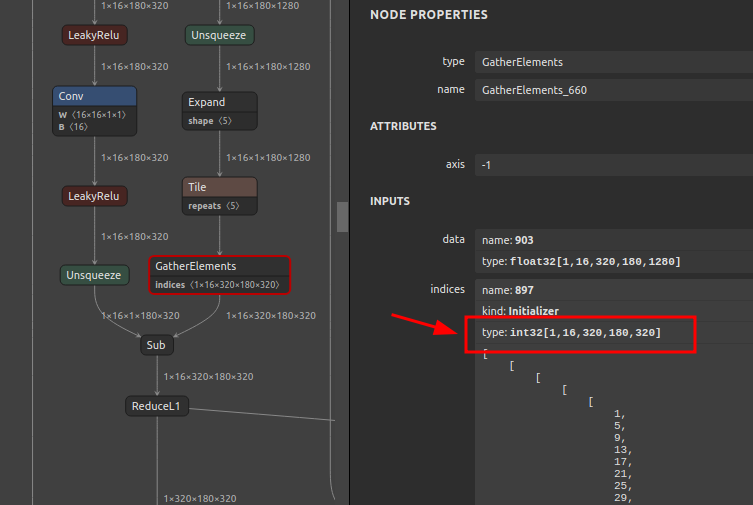
ポイントを絞ってご説明すると、Tile オペレーションを定数化する過程で、Int64 形式の定数が 1x16x320x180x320個 (つまり 294,912,000個) 約3億個も生成されてONNXモデルに埋め込まれる爆弾を抱えていました。294,912,000 x 64bit ですので、2.2 GB です。PyTorchの torch.meshgrid を使用した場合に発生する問題です。
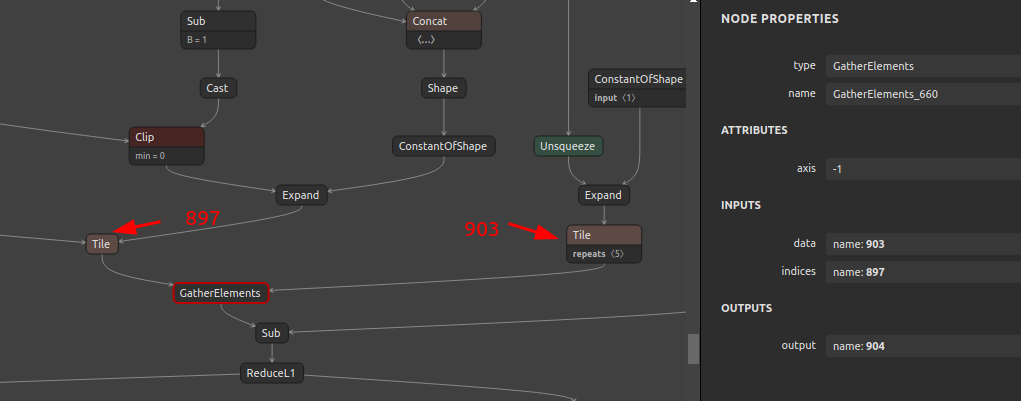
画像中の GatherElements は私のワークアラウンドを適用したあとの Int32 へキャストした GatherElements ですので、半分のサイズの 1.1 GB に縮小した状態です。それでもなお、Tile ひとつと GatherElements ひとつの組み合わせ部分だけで 1.1 GB ものモデル肥大化を招きます。onnx-simplifier のデフォルトの動作で Tile の最適化がスキップされるため、Tile を含めた最適化有効・最適化無効を切り替えるオプションの実装が待たれます。
6-2. simple-onnx-processing-tools
基礎編の最後です。次章以降に応用的なモデルチューニングをご紹介するに先立って、onnx-graphsurgeon や onnx-simplifier と組み合わせて使用するONNX加工用ツール群をご紹介します。simple-onnx-processing-tools というツール群です。ONNXモデルの分割、結合、OP削除、サイズ圧縮、属性・定数書き換え、OP生成、OPセット変更、指定入力順への変更、OP追加、RGB→BGR変換、バッチサイズ変更、OP一括リネーム、JSON変換などが可能です。すでに前章までの基礎編でごく一部のツールを活用してONNX構造の基礎理解に役立てましたが、応用編では未登場のツールを使用してあらゆる変換を試行します。

対応しているタスク・ツールは下記のとおりです。応用編で常用します。全て自作のツールですが、ONNX加工に関するほぼ全てのユースケースに対応しています。
| No. | Tool Name | Tags | Summary |
|---|---|---|---|
| 1 | snc4onnx |
  |
Simple tool to combine(merge) onnx models. Simple Network Combine Tool for ONNX. |
| 2 | sne4onnx |
  |
A very simple tool for situations where optimization with onnx-simplifier would exceed the Protocol Buffers upper file size limit of 2GB, or simply to separate onnx files to any size you want. Simple Network Extraction for ONNX. |
| 3 | snd4onnx |
  |
Simple node deletion tool for onnx. Simple Node Deletion for ONNX. |
| 4 | scs4onnx |
  |
A very simple tool that compresses the overall size of the ONNX model by aggregating duplicate constant values as much as possible. Simple Constant value Shrink for ONNX. |
| 5 | sog4onnx |
  |
Simple ONNX operation generator. Simple Operation Generator for ONNX. |
| 6 | sam4onnx |
  |
A very simple tool to rewrite parameters such as attributes and constants for OPs in ONNX models. Simple Attribute and Constant Modifier for ONNX. |
| 7 | soc4onnx |
  |
A very simple tool that forces a change in the opset of an ONNX graph. Simple Opset Changer for ONNX. |
| 8 | scc4onnx |
  |
Very simple NCHW and NHWC conversion tool for ONNX. Change to the specified input order for each and every input OP. Also, change the channel order of RGB and BGR. Simple Channel Converter for ONNX. |
| 9 | sna4onnx |
  |
Simple node addition tool for onnx. Simple Node Addition for ONNX. |
| 10 | sbi4onnx |
  |
A very simple script that only initializes the batch size of ONNX. Simple Batchsize Initialization for ONNX. |
| 11 | sor4onnx |
  |
Simple OP Renamer for ONNX. |
| 12 | soa4onnx |
  |
Simple model Output OP Additional tools for ONNX. |
| 13 | sod4onnx |
  |
Simple model Output OP Deletion tools for ONNX. |
| 14 | ssi4onnx |
  |
Simple Shape Inference tool for ONNX. |
| 15 | sit4onnx |
  |
Tools for simple inference testing using TensorRT, CUDA and OpenVINO CPU/GPU and CPU providers. Simple Inference Test for ONNX. |
| 16 | onnx2json |
  |
Exports the ONNX file to a JSON file. |
| 17 | json2onnx |
  |
Converts a JSON file to an ONNX file. |
| 18 | sed4onnx |
  |
Simple ONNX constant encoder/decoder. Since the constant values in the JSON files generated by onnx2json are Base64-encoded values, ASCII <-> Base64 conversion is required when rewriting JSON constant values. |
| 19 | ssc4onnx |
  |
Checker with simple ONNX model structure. Simple Structure Checker for ONNX. Analyzes and displays the structure of huge size models that cannot be displayed by Netron. |
| 20 | sio4onnx |
  |
Simple tool to change the INPUT and OUTPUT shape of ONNX. |
| 21 | svs4onnx |
  |
A very simple tool to swap connections between output and input variables in an ONNX graph. Simple Variable Switch for ONNX. |
| 22 | onnx2tf |
  |
Self-Created Tools to convert ONNX files (NCHW) to TensorFlow format (NHWC). The purpose of this tool is to solve the massive Transpose extrapolation problem in onnx-tensorflow (onnx-tf). |
| 23 | sng4onnx |
  |
A simple tool that automatically generates and assigns an OP name to each OP in an old format ONNX file. |
| 24 | sde4onnx |
  |
Simple doc_string eraser for ONNX. |
| 25 | components_of_onnx |
[WIP]  |
ONNX parts yard. The various operations described in Operator Schemas are converted in advance into OP stand-alone ONNX files. |
X. おわりに
ONNXのモデルチューニングテクニック (基礎編) は以上です。次回は 応用編1 として実践的なONNXモデル加工のテクニックをご紹介したいと思います。
- モデルのチューニング [応用]
Author

